Categories
Aesthetic Lighting Help Technical Lighting Help

Lighting and Sustainability

I was recently asked to speak about sustainability and how it impacts lighting. I have to admit, this is a tough one. There are a lot of elements under the sustainability umbrella; only a handful relate to lighting.

Much effort has occurred over the last fifteen years centered on the reduction of energy consumed for illumination. Lighting, specifically designed to respect the “Dark Skies” (light pollution) and sea turtle habituate is now readily available. Pendants constructed of old, recycled wine bottles are available. (Desire for them is another thing.) Digging deeper into sustainability will require an almost complete rethinking of how we light our homes, in much the same way that commercial buildings are embracing daylight harvesting, site placement and advanced fenestration design.

In a recent post, I suggested the reduction of decorative lighting would be an inevitable aspect of the future of lighting. Sustainability is the main reason. Lighting as we see it now is a fashion business. Like necktie widths and hem lengths, lighting goes in and out of style. With long-lasting LED, the twelve year aesthetic cycle is anathema to lighting that could be functionally viable for thirty. This fissure can only be overcome with good lighting design and application that promote the appearance of light, not the look and form of the luminaire.

Another aspect of sustainability we have heretofore ignored will be reuse. Tossing a dated chandelier in the garbage is pretty common. Creative people will need to come up with adaptive reuse as we enter the sustainability era.

My wife and I took on our first rehab project when we moved into our second home in 1990. It was a great 1917 colonial with much of the original lighting still in-place. Despite an update on the entire living room, we kept the slightly gauche ceiling light in place. It was just too, “too” to remove!

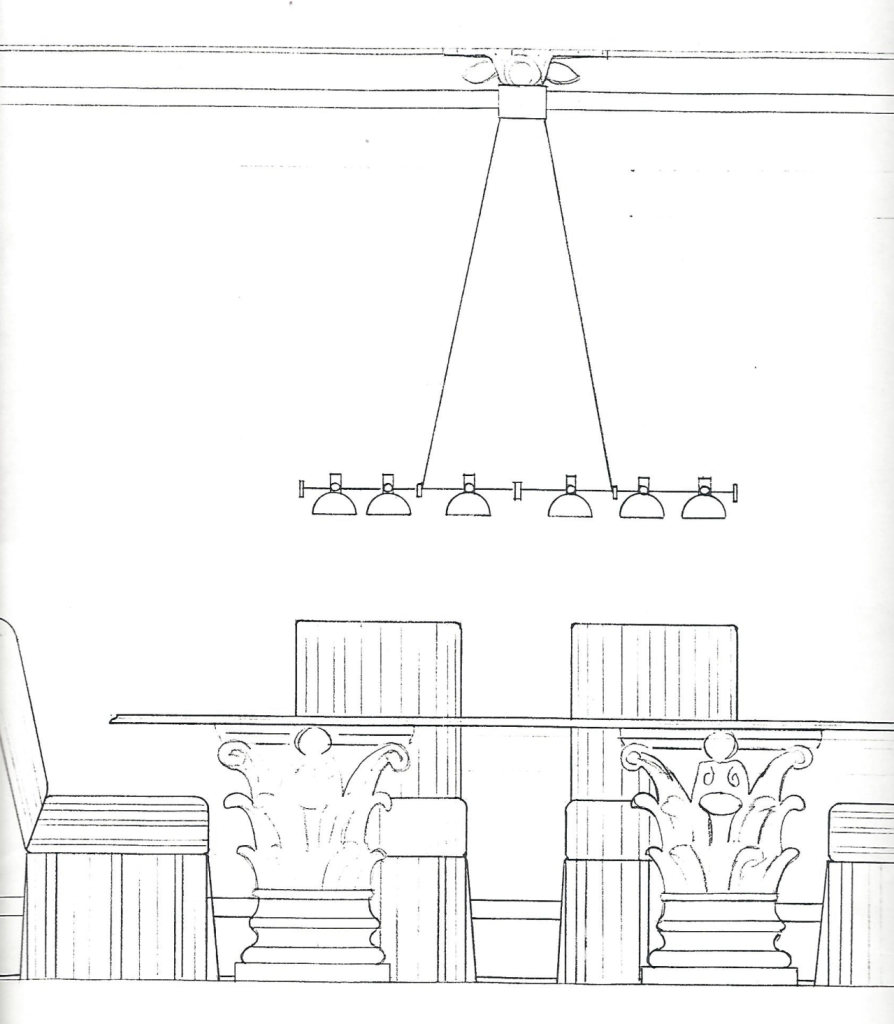
When we redid the dining room, we wanted a chandelier over the table. The room was already equipped with a ceiling flush-mounted, gold plaster starburst with five light bulbs jutting out at a 45° angle. We simply could not remove it, so I turned the piece into an exaggerated, lighted ceiling canopy. I wired it into the chandelier and it remained proudly on the ceiling until we sold the house.

My circa 1990 dining room sketch with the original ceiling flush light serving as a canopy for the modern linear chandelier.

To the obvious benefit of Salvation Army and Goodwill stores everywhere, spray painting old Spanish Bronze and Faux Williamsburg chandeliers manufactured in the 1970’s has been a popular way to light kitschy boutiques and cutting-edge restaurants for years. Like all trends, that too will end and we will be left with hard sustainability decisions. With more lighting hidden in the structure and fewer decorative pieces, future generations will be left with usable lighting AND a more receptive planet.

Before creating your next room design, give a moment of thought to sustainability. Is there possible adaptive reuse of existing lighting? Would the room be better served with creatively applied utilitarian lighting that will last through the next two redesigns? Considering a sconce made of recycled 2-liter Mountain Dew bottles, might, however be a bridge too far.

Categories
Technical Lighting Help

Circadian Supportive Lighting

In my last blog post about the future of lighting, I only mentioned circadian-supportive lighting in passing. I received a few comments that suggested I should be more-bullish on this type of light. Here’s why I stand by my opinion.

Over the last decade, I have attended countless lectures and panel discussions covering light, more specifically how light relates to health and our perception of color. Following the completion of the first session, I was immediately optimistic for the future. Initially, change seemed so easy. Unfortunately, the more I learned, the dumber I got.

Color wasn’t just CCT and Color Rendering. After each lecture, another wrinkle was added. Chromaticity, spectral power distribution, gamut, tri-stimulus values and metamerism all turned a simple solution into a complicated problem. What seemed like a “no-brainer” quickly turned into a much more complicated issue.

I remember attending an annual Energy Star conference. An open session on color damn-near turned into a bar fight between an audience member and the moderator. The topic was not a political fight, a sports-based disagreement or even a spurned lover. This was a harsh exchange about each person’s understanding of the color of light. Certainly not the typical argument you’re likely to overhear at Danny’s Tavern. (Feel free to insert the name of the local watering hole of your youth.)

Early on, the importance of circadian-based lighting in the future seemed obvious. Its increased use became my assumption, too. The more I learned and saw of the trajectory of LED, I began to pull back on the notion. LED is getting cheaper and with that, delivering poorer quality light. Why would I now expect a reverse of that trend? Will circadian sensitive lighting be the one thing that reverses our desire for cheap?

In one of the lectures, an audience member asked the speaker if he thought all light in the future would be circadian-regulated. He flatly stated, “No!” he gave his rationale. “We all know the typical office chair is bad for our body. Engineers have developed the quintessential solution to solve all of the problems that harm our musculoskeletal systems. How many people have purchased these chairs? Ten, twenty percent? If consumers will not purchase a more expensive chair to solve a known medical problem today, why would we think they will do so tomorrow?”

From my perspective, I want to believe lighting is much more important than a chair; but is it? I don’t suspect I’d get into a bar fight over it, but the evidence is not very compelling. Circadian lighting, like the Aeron Chain and GE Reveal lamps will appeal to a rarified population. They will be available, helpful and better, but because of the cost, ignored by the bulk of the population.

Categories
Technical Lighting Help

The Future of Lighting

I was asked an intriguing question this week. “What do I think lighting will look like in the future?” With all of the changes that have occurred in lighting over the last decade, you might expect a period of rest or inaction, but I really don’t think that is likely. The cat is out of the bag. Users, creators, scientists and researchers are more aware of lighting then at any time since Edison. Lighting will remain a kinetic force in our lives.

Outside of the residence, there are going to be even more changes, but if I strictly concentrate on residential lighting, I (and my Magic 8 Ball) feel pretty comfortable with the following observations.

Less Decorative Lighting

Two-story foyers are gone (for the most part) dining rooms are disappearing, flex-space is growing and landscape lighting is a much more effective way to light an exterior of a home then a surface mounted porch light. Couple that with an increase in the amount of pre-fab or modular construction and lighting built into the fabricating structure of a home will be more and more commonplace.

Decorative lighting also carries with it a “style.” Whether contemporary or traditional, some portion of the population doesn’t like it. Style becomes an alienator, preventing a sale. If the core building is style-agnostic, it becomes easier for a future homeowner to imagine herself in the space. Removing decorative lighting, perhaps as slowly as bedroom lights and hallway light disappeared, appears to be a sure bet for the future.

Integrated LED

We are all lighting maintenance people. We don’t service washers, dryers or ovens, but lighting is different. As if it were a birthright, we feel compelled to change light bulbs. Our incandescent mentality causes us to worry about buying lighting that eliminates the need for re-lamping. We are suspicious, unbelieving and skeptical, this innate portion of our psyche being so powerful. Despite our overwhelming resistance, integrated LED lighting will overtake and replace lighting with replaceable light bulbs. It has quietly gobbled up lighting category after category. First landscape lighting, then recessed, linear architectural detail lighting, under-cabinet lighting, contemporary chandeliers and the table is set for bathroom lighting…and the world has not ended! There is life after light bulb replacement.

As we move into tomorrow, the shift will be further advanced by poorer quality (but cheap!) replacement light bulbs and a shifting aesthetic direction that will be more clearly borne out with integrated LED. Well-designed integrated LED lighting will operate in a residential setting for over twenty years. When the average redecoration of a home is every seven years, this is likely to exist through three remodels.

As the Gen Z and Alpha demographic will understand best of all, there will be much better things to do than change light bulbs!

Smart Lighting

Home automation is inevitable. Your great-grandmother couldn’t understand the need for a cloth dryer, your grandmother didn’t need an air conditioner and your mother doesn’t need a smart phone. Like the preponderance of dryers, AC and smart phones indicates, home automation is going to happen. A voice activated home will be de rigueur. The typical consumer has already linked an intelligent home to automatically turning on and off lighting. It is one of the first things people do with their new Alexa or Google voice system.

A few things could happen. The luminaire will include a smart “dongle” or, “dongles” will be wired between each luminaire and the house wires, but rest assured, the ability to configure it to a smart system will be there. That then leads to the next prediction.

The Elimination of the Light Switch

When a luminaire is intelligent, why does it need something as “dumb” as a light switch? When you remove the switch, you also eliminate the yards of wire that link it physically to the outlet box. The home becomes easier to wire, holes are removed from walls, backsplashes and panels. The cost savings alone might make this the first prediction to come to fruition.

For Better, or Worse

When LED was first introduced, the sky was the limit and lighting professionals felt, finally, we would have GREAT light. That optimism was unfortunately, a bit too much and too soon. To get prices down, many concessions were made. Those concessions resulted in lower quality products. One need look no farther than the surface-mounted, recessed can replacements. These are a poor light source that creates far too much glare. Take a look in a “big box” store, also. The 40,000 to 50,000 hour light bulbs are slowly being replaced with 10,000-15,000 hour models.  Yes, they are cheap, but….

I suspect that the future will re-find a place for better lighting. It will appeal to a select clientele who understands the value of good light. More effective, less glary cans, circadian adjusted light output and adjustable bathroom lighting are just around the corner, especially for those who appreciate the difference between good and poor lighting.

Categories
Technical Lighting Help

Backlighting (Countertops, Wall Panels, Posters, etc.)

As with so many other types of lighting, including backlighting in a design has become far easier with LED. Just a few years ago, achieving decent backlighting required a lot of prep work and post-installation concessions needed for lamp replacement. Today, with LED on the market, backlighting can be achieved in a number of ways.

LED Tape

To arrive at a decent backlit surface, a frame is required. The object to be backlit is placed on the frame. LED Tape is then placed around the perimeter, aimed into the void of the frame. While the whole object is illuminated, the perimeter is brighter where the LED diodes are located. The middle, or point farthest from the light are a bit darker. Performance also varies with different materials. It isn’t always perfect, but far better and easier than what could be achieved in the past.

LED Panels

An inevitable byproduct of LED Tape is panels. Multiple rows of LED “dots” installed on a square or rectangular substrate deliver a consistent, even pool of light. “Stand-offs” positioned on the panel separate the object from the light. This is a definitive improvement. The surface illumination is free of dark areas. Because of the specific panel dimensions, there is still a possibility of inconsistency unless the countertop and panels are the exact same size. To solve that issue, some companies offer custom panels, but the advantages of inexpensive LED are then lost in customization fees.

LED Sheets

LED Sheets are now on the market. If you have not seen them, imagine LED Tape, placed side-by-side, row by row. The individual diode emits less light, but there are much, much more of them. In addition, the sheets of LED can be cut in almost any number of ways and connected to adjoining sheets for a consistent glow under almost any translucent material. If a countertop, for example, has a waterfall edge, the panels can even be bent to continue down the side. This is a very flexible option that now makes backlighting a very simple feat.

Next?

Is this the ultimate solution for backlighting surfaces or objects? For now. With solid state lighting, I have learned to eliminate absolutes. In the future, I think OLED panels will become the go-to answer for backlighting, but today, those panels are still too expensive, in limited sizes and therefore less available. Will laser advancements change my mind next week? What if we could safely illuminate the countertop with germicidal ultraviolet, thereby removing all the accumulated cooking germs each night? Coming soon. For now, take a look at the “cuttable” LED sheets. It is turning out to be the best bet, at least until the next cool invention arrives!

Categories
Technical Lighting Help

Four and a Half Lighting Tips for Age In-Place Home Designs

America is now home to the largest-ever population of senior citizens. This group is retiring at a rate of 10,000 per day. By their own admission, they refuse to do so in the same way as their generational predecessors. That means, for the next twenty years, designers and architects will be creating living environments that support people who are getting older. Along with wheelchair accessible showers and easier to operate door handles, lighting alternatives must be considered.

As we age, a number of things occur in our eyes. Pupils begin to constrict. The lens begins to yellow and the cornea becomes more opaque. The muscles surrounding the eye become less responsive and we have an 80% change of developing cataracts. All of these issues can be ameliorated to some degree with more intelligently implemented lighting. While there are MANY ways to make lighting better for the aging eye, let’s start with the four most helpful.

#1 – Get Rid of the Long Bathroom Light Over the Mirror

If you do nothing else for the senior when designing or remodeling, at least avoid the long bar light over the top of the bathroom mirror. This is the single most egregious luminaire for the aged eye. As we tip our head upward for personal grooming, we are forcing our eyes to stare directly into the light. This introduces glare and that is difficult for the eye to process. Instead, use a light on each side of the mirror. Select those with good diffusion (No clear glass!) If possible, include one overhead light, such as a deep recessed can, on the ceiling. Light from three directions will ameliorate any shadows and reduce any glare.

#2 – Don’t Use Surface Mounted “Recessed” Lights

Surface mounted replacements for recessed cans are growing in popularity because they are inexpensive. They are also big, fat glare bombs. The glare created will distract and obfuscate sight for the senior. If recessed cans are planned, be certain to select those where the light source is pushed back into the plenum at least 2 ½” to 3”. Find those that deliver a beam of light at 60° or less. The concentrated beam emitted from a deep base will deliver a much more comfortable light for senior eyes.

#3 – Bedroom to Bathroom Lighting

For reasons best left to medical people, older adults visit the bathroom in the middle of the night more than younger people. These dark trips can easily result in a fall. Turning on bright lights can quickly disrupt melatonin replenishment. Night lighting, or motion activated lighting that delivers a clear path from bed to toilet should be included to avoid both problems. Consider adding LED Tape under the sink, under the bed or along the baseboards to assist in navigation. Be certain the switch is position within reach of the bed. If a nightlight is used, NEVER employ a blue color! Use a maximum of 2200K (Amber) or a red light. These colors will not disrupt sleep.

#4 – Illuminate Changes in Elevation

A simple fall can be life-altering for an older adult. Many household falls can be attributed to steps and stairs. Especially problematic are small changes in elevation, such as those found in sunken living rooms and multi-level architecture. Those can be exacerbated by treads and risers finished in the same color. As we age, we lose a portion of our ability to differentiate color. Misinterpreting where the tread begins causes improper foot placement resulting in a fall. Lucky, LED Tape is now inexpensive and readily available. Illuminating the underside of a tread, adding an illuminated tread channel at the edge of each step, or running an extrusion down the full flight can add much needed light. There are great step-lights and even handrails with light coming from the underside. With scores of step lighting solutions, this problem can easily be eliminated.

#4 ½ – Hallway Lighting

The loss of surefootedness will carry into the hallway, especially those with a consistent color such as hardwood or wall-to-wall carpet. Throw rugs are also dangerous. The lighting used on stairways and steps can be carried into the halls. Sconces and overhead lights can add to glare, but step lights designed to push light down onto the ground will provide helpful illumination, without the harmful glare. Navigating a hallway without tripping over the cat or the rumpled-up rug prevents falls.

…and More

Get rid of clear glass and decorative “Edison” vintage lamps, add indirect light over cabinets, at toekicks and inside cabinets, use aiming, opaque-shaded sconces on each side of the bed and place lamps to the side and behind reading chairs. If the elimination of glare, coupled with an increase of light is considered, solutions will immediately come to the fore. The older user needs different lighting. Remembering that will result in a successful age in-place design.

Categories
Technical Lighting Help

Is There A Future For Undercabinet Lighting Fixtures?

I have been writing a speech about LED Tape for delivery to a group of Interior Designers and Architects. Midways through, I wondered if there was really any reason for the old under-cabinet lighting fixture. Has the need been replaced with LED Tape?

In the 1990s and early 2000s, undercabinet luminaires were flying off the shelf. It was as if people finally realized that more light on the countertop was going to help them see while cooking. Sure, the old, clunky fluorescent units were around forever, but they never made it into every home like the Halogen versions. Halogen was new and exciting. When Xenon eventually replace Halogen lamps and people realized they did not have to scorch the wood on their cabinets to get good light, popularity again jumped. A new home, or kitchen remodel simply wasn’t complete without lighting on the underside of the cabinet.

That was an important evolution in the understanding of Light Layering. Lighting, properly positioned for the specific intent of illuminating the area on which a task is performed, helped people understand the value of all light. Working in shadows wasn’t necessary. You did not need to “make due.” Lighting could be helpful. There were side benefits as well. Indirect illumination magnified the backsplash and made it look fabulous. It made the room pop. In a subtle way, it began a journey for homeowner’s appreciation of the third layer, Accent Lighting.

Accent lighting was however, expensive. The linear systems were complicated and the spotty light was provided by finicky festoon lamps. They were a pain to install and a bigger pain to keep functioning. When LED Tape arrived, the linear festoon systems disappeared like a truck at a David Copperfield show.

The original rationale for sticking with undercabinet luminaires was the large amount of light output. Like the Copperfield truck, that logic is also disappearing. To achieve lower costs, many of the available under-cabinet units are reducing their lumen output, thereby eliminating the one advantage they had. When cost is the only determining factor, LED Tape wins, hands-down. A one-foot section of LED Tape is substantially cheaper than a 12” undercabinet luminaire.

Under-cabinet luminaires do provide a very clean installation, with no unsightly wires (usually.) That installation is however dependent on a specific type of cabinet construction, which is also disappearing. [Insert reference to David Copperfield and a truck.] Finished bottom cabinets, European cabinets, the rise of “shelf only” upper storage and faux façade kitchens means that undercabinet luminaires are quickly turning into the millennial version of a buggy whip.

LED Tape has advantages, too. Light is cumulative. Adding a second strip will double the output. There are scores of channels and extrusions now on the market that will dress the LED Tape to make it more visually appealing. Angling the tape to put more impact on an expensive backsplash is likewise very easy. Cost, always a concern, remains very low.

There are things that are still needed. LED Tape could use a simple, clean and small transformer/driver that could be more easily hidden and connected to the 120V input. Rather than the “matchbox” shapes, is a flatter, wider, longer option more usable and less noticeable? Could it be hidden in a more decorative element? Like the rest of the kitchen before it, this utilitarian room with workaday equipment has been transformed into a highly desirable and aesthetically appealing space. We should expect LED Tape to follow suit.

New kitchens and kitchen remodels are evolving into LED lit environments. Recessed cans are now LED, toekick lighting, above cabinet lighting and inside cabinet lights are LED. Some of the most stunning new decorative designs feature LED. It is inevitable that all under-cabinet light will eventually switch to LED Tape encased in some sort of trim. When those 12”, 24” and 36” rectangular boxes of light are gone, you might think David Copperfield had something to do with it, but you’d be wrong. This time, it was the maturation of LED Tape.

Categories
Technical Lighting Help

Should I Install My Own Landscape Lighting?

A few weeks ago, I read an article in an influential national newspaper about the value of adding lighting to residential outdoor spaces. In the story, a designer talked of the ease of installation and reiterated a common misconception about covering low-voltage wire under only mulch. That flaw in information made me rethink the belief that low-voltage landscape lighting was a viable DIY project. Despite its perceived simplicity, there are many things that make it more complex and a professional might be a better option.

Wire Burial

In a low voltage system, more heat is created when compared with traditional 120V wiring. Because of that, the wire is a larger gauge with thicker insulation. Mulch is simply dried wood. If the wire were covered by mulch, the heat would build and eventually, the heat would ignite the mulch, first smoldering, then turning to flame. Soil serves as an insulator. Burying this wire in 6” of earth provides the additional heat protection needed for safe operation.

Wire and Amps

A transformer in a low-voltage lighting systems contains a breaker that provides electrical protection from overheating. Its protection is based on an amperage maximum. When the breaker experiences “activity” in the system in excess of that amount, it trips, thereby protecting the system from damage. Wire also contains an amp rating. The wire selected must be of an equal or greater amp rating as the breaker in the transformer. Failure to do so, could result in wire overheating before the transformer senses a problem. A professional landscape lighting designer/installer will understand the importance of balancing the protections provided by both the wire and the transformer’s breaker.

Wire Connectors

Like the transformer and the wire, wire connectors are UL listed/CSA certified and serve as a key link in the electric chain created in a low-voltage lighting system. Using an inappropriate connector in the wrong way can also result in electric failure.

Wire connectors are rated and tested for a very specific collection of wire combinations. People might select a connector based on color or what appears to be “big enough”, but proper choice is much more involved. A typical trunk line, the wire that travels from the transformer to the lighting fixture is 12 gauge wire. Most luminaires employ 18 gauge wire. That means the wire connector must be rated to connect one 18 gauge and one or two 12 gauge wires. On the back of the carton, in very small type, all of the various connections are listed. It is important to insure that the connection intended is included in the list. If not, the liability falls to the installer, not the connector manufacturer.

Wire used in low-voltage landscape lighting must also be rated for “direct burial.” This usually means it is gel-filled. As the wire enters the connector and it is turned clockwise, the gel surrounds the copper strands and seeps out the bottom fully encapsulating the connection. Furthermore, the connector must also be properly turned and tightened onto the wires or another problem, electrical arcing, will occur.

Watts vs. Volt-Amps

In an incandescent world, understanding the capacity of a transformer was easy. Add up the wattage consumption and don’t exceed the output. LEDs are different. A factor must be included to compensate for the different way in which the LED uses electricity. For LED systems, the installer must use the volt-amp (VA) number provided. For example, a lamp might use only 4.5 watts of energy to provide light, but the VA is 6.1. 6.1 must be used to properly calculate the load capacity for the transformer.

Design Expertise

Perhaps the most important reason to contact a professional landscape lighting designer is the expertise they hold. Many do-it-yourselfers are talented folks, but residential landscape lighting is an unusual skill. Heightening the look of a residence, the outdoor living area and/or the gardens takes an artistic understanding that is grown year over year. Through experience, they know what works on certain trees and what doesn’t on other plants. They have learned how to properly illuminate a walkway, eating area and a deck. While the safety aspect is very important, it can be learned. The design skills polished over a career are less transferable.

Low Tech vs. LED

In the days of incandescent low-voltage landscape lighting, the entire process of balancing the electric load to deliver a consistent output was VERY complicated. Even some of the younger professionals had a difficult time learning this technique. Since low-voltage landscape lighting has become an LED business, that skill is thankfully, no longer required. The systems however remain an electric connection and all of the other safety precautions must still be maintained. Couple this with the needed design skills and the answer to my question is probably, “No.” To get a great outdoor lighting look, installed properly, you should call a professional. You’ll be happy you did…and you won’t have a fire in your flower bed, either!

Categories
Aesthetic Lighting Help Technical Lighting Help

Lighting and Bathtubs

Nothing will get a collection of designers and electricians more riled than a conversation about lighting over a bathtub or soaking tub. With good reason. The National Electric Code (NEC) has struggled to find the correct wording that makes their intent clear and that has resulted in confused implementation of what should be an important safety precaution. The latest version of the NEC has not altered the intent, first established in 2005, but new phrasing has been tried. I’ve now read it multiple times and frankly, it’s not much better. If you’re as confused as everyone else, let me try to make it clearer.

“No Hanging Lights” Zone

Imagine an “invisible box” around a tub that extends 3’-0” on all four sides and 8’-0” from the top-most lip. Simply put, no hanging fixture is allowed in this area. Hanging fixtures are defined as chandeliers, pendants, track lights and ceiling fans suspended on a chain, cable or cord. While not specifically called out, we should consider a stem as well. Surface mounted and recessed lighting is NOT included in the list.

The “No Hanging Zone” is the red area above the lip of the tub top, extending 8′-0″ above and 3′-0″ on each side. No hanging lights are allowed in this area.

Big Rooms and Extra Tall Ceilings

We all know bathrooms are continuing to grow and ceilings are getting taller. If this is your situation, a hanging light can be installed outside the “invisible box” but it must be UL/CSA listed for Damp Location. If, for some reason, the water from a showerhead has the ability to reach up into the area above the “invisible box” the luminaire must be listed for Wet Location.

For rooms with extra tall ceilings, a suspended lighting fixture is allowed, as long as the bottom-most portion (that includes dangling crystals) is 8′-0″ above the top lip of the tub. The lighting must also be safety tested and listed for Damp Location.

Surface Flush and Recessed Lighting

Surface mounted and recessed lighting is acceptable over a tub or shower. It is advisable to use Damp Location listed product here, simply because of the moisture that is so often found in the space. Products with exposed light bulbs are not acceptable.

Recessed lighting and fully enclosed, flush-mounted lighting is acceptable over a bathtub. A surface-mounted light with an exposed light bulb, as shown on the right is NOT allowed.

If I Can’t Use A Chandelier, How Can I Make the Room Pop?

There are a number of aesthetically interesting options that should be considered as an alternative to a chandelier over the tub, if a flush unit does not meet your needs.

A single recessed can will certainly add light to the space, but will not add to the visual interest. That does not mean this option should be abandoned. Perhaps two or three adjustable recessed units could be just what is needed. They could be aimed into corners, crossed-lit like Hollywood klieg lights or set to illuminate artwork surrounding the tub in more extravagant settings. Just remember, if this is a soaking tub, don’t aim a light at the headrest on the edge of the tube and always include a dimmer so a relaxed atmosphere can be created. Floor mounted recessed should also be considered, especially if the tub is tucked into an alcove or corner.

Creatively placed and positioned recessed lighting can add interest whether aimed at walls, cross-lit or floor-mounted, dressing a corner. Just remember to aim the light away from the tub users eyes.

LED Tape is a remarkably flexible product and its inclusion can turn a simply bathtub into a photo-worthy dream. LED Tape can be added to a tray ceiling, behind cove molding that wraps the perimeter of the area and tucked into the floor molding that surrounds the tub.

By using extruded aluminum channels, patterns can be created on the wall and ceiling. The channels are the exact same thickness as drywall, so they simply assemble to the studs prior to drywall installation. LED Tape is then installed in the channel and wired. Once the wallboard is nailed in place, taped and painted, an extruded diffuser is snapped into the channel. A pattern of light now dances across the walls and/or ceiling, unique to the room.

LED Tape under a footed tub or surrounding built-in tubs can also be a show-stopping addition. Selecting a color or color-changing RGB LED Tape will increase the visual interest and add to the unique aspect of the space.

LED Tape, placed in extruded channels can be fashioned into custom linear designs that move from walls to ceilings. RGB LED under or around a tub can add unexpected color to the room, differentiating the space in yet another way.

Life Beyond Chandeliers

It is easy to see that a chandelier over a tub is disappearing from likelihood in most homes, but that does not mean creativity must die. In fact, options are multiplying and readily available. The only thing that needs to be turned-up is creativity!

Finally, with every discussion concerning codes, local authorities have the ability to mandate more stringent variations of the NEC. It is always wise to consult the specific state and local electrical ordinances before beginning a job.

Categories
Aesthetic Lighting Help Technical Lighting Help

Bed Lamp Alternatives

We fuss aimlessly over the chandelier choice in our dining room and the mini-pendants over the island in the kitchen. In the bedroom, we take less time and simply fall back on some tired old bed lamps. Why? There are other options. Here are a few alternatives to consider along with some installation tips.

Pendants

If you are the type of person who accumulates a lot of things on the bed stand, hanging a pendant overhead frees those surfaces. Beyond this very practical reason, bedside pendants can add an unexpected level of flair to the room. Differentiate the space, by using a small pendant, larger pendant or even a cluster of two or three narrow units hung at varying elevations. When doing something uncommon, the room takes on a unique characteristic.

Sconces

Sconces can be another alternative to lamps, especially if reading in bed is part of your pre-sleep, nighttime routine. Adjustable, articulated sconces are extremely popular today, so finding one that compliments the design of the room will be very easy. This method of lighting is also growing in popularity because of the aging eye. Totally adjustable light can be positioned exactly where needed for the perfect reading light.

Another sconce option is the portable pin-up type widely available in the market. The light can be hung exactly were needed. Like a bed lamp, these simply plug into a wall outlet. A cover runs down the wall masking the cord.

Placement

Perhaps the reason for the popularity of a lamp is their ease of placement. Regardless of the bed size or the position of the nightstand, lamps are quickly set up and ready to use.

Pendants and hard-wired sconces require a touch more planning. A California King will need outlet boxes installed farther apart than a twin bed. If wired lighting is employed, the size of the mattress, headboard or bed frame must be known. (Whichever is the widest.) The placement in the room must also be defined. Add 12” to each side and place the center of the outlet box at that point.

Sconces are typically mounted 60” to 72” from the floor. If the bed is a conventional height, use the 60” option, if the bed is a low, platform-type, you may want to have them installed lower. Imagine sitting up in bed, reading. The light should be about shoulder height.

To properly place sconces on each side of the bed, take the widest portion of the bed, frame, etc. and add 12″ to each side. That becomes the centerline of the outlet box. Height from the floor will depend on the style of bed.

A typical bed stand is 18” deep, so the center of the ceiling outlet box for a pendant should be installed 9” from the wall. Dimensions might need adjustments to accommodate larger pieces of furniture, oversized headboards or deeper bed stands.

I like the bottom of pendants to fall 48” from the floor, again with conventional type beds. Lower beds will probably need that to drop based on the frame design.

Outlet box placement for ceiling mounted pendants is calculated the same as wall mounted sconces, the widest portion of the bed plus 12″ on each side. Position the bottom of the shade at 48″ from the floor and make any adjustments based on bed height and personal preference.

Luminaire Features

With fixed sconces, adjustable/articulated sconces or pendants, the shade material should be opaque. (This should be the same with portable bed lamps.) Remember bedrooms are designed to prepare you for rest. Dark shades with light aimed downward and possibly upward is indirect and very “easy” on the eyes. They will minimally impact the relaxation process we pass through as we prepare for sleep.

Recessed Cans

Especially in hospitality suites, recessed cans are growing in use over beds. Usually, this is accomplished with a single light over each pillow position. Unfortunately, this method does create a bit of spill onto the head/face of a sleeping partner. A better option is the use of adjustable recessed luminaires placed on each side of the bed. With a narrow beam light aimed across the bed, all of the “spill” light ends up on the floor and not in our partner’s face.

If recessed cans are used for in-bed lighting, to avoid spill lighting on a sleeping partner, use adjustable swivel lights with a narrow beam and aim them across each other. Excess light will fall on the floor not their face.

Switching Options

Pin-up portable sconces will have a line switch on the wire. This may be difficult to reach. If these are selected, pay close attention to how they operate. If inconvenient, the addition of a floor switch might be helpful.

For hardwired sconces and pendants, a switch should be positioned on each side of the bed to control the light on that side. If your partner is notorious for falling asleep with the light on, three-ways switches on both side can be very helpful! The center of wall switches are typically positioned 48” from the floor. This should work well for conventional beds and as with other accommodations required for platform beds, a lower placement might be easier to use.

I also recommend a switch next to every bed that controls the night light or toekick lighting in an adjoining bathroom. As we age, we take more trips to the bathroom in the middle of the night and navigating that short distance might seem easy, but isn’t. Aging eyes need more light and this added control could prevent a life-altering fall.

Another option to consider is a motion sensor activated light switch that controls under-bed lighting. The moment a foot touches the ground, the under-bed lighting (usually LED Tape) activates. Because of its location, your sleeping partner is not disturbed.

Under-Bed lighting can provide the soft illumination needed to avoid circadian disruption and assist in nighttime navigation. Motion activations makes it easy to use.

Bedrooms are for sleeping and because of that, darkness is key. Nighttime activity and even navigation is inevitable and the only way insure this darkened room services the needs of the homeowner is proper lighting, properly placed with the correct controls. Boring lighting is not, however a mandate and there are many ways to avoid that unfortunate outcome.

Categories
Technical Lighting Help

Closet Lighting

An exposed light bulb with a string hanging down to the middle of the doorway had been the de facto method of closet lighting. That changed many years ago because of countless fires. Now lighting in closets is heavily regulated. The National Electric Code (NEC) has very specific location and placement requirements designed to separate lighting from the flammable garments and materials stored therein. The creation of cooler operating LED has made compliance easier, but the rules must still be followed. Here are a few things to understand about closet lighting.

Allowable lighting in Closets

There are three types of lighting that are allowed in closets.

  1. Surface mounted or recessed completely enclosed, incandescent or LED
  2. Surface mounted or recessed fluorescent
  3. Surface mounted fluorescent or LED listed as suitable for closet applications

That means, there are lighting products that cannot be used, such as the aforementioned exposed light bulb with pull chain in addition to open recessed cans.

Closet Storage Areas

The NEC regulations define areas where content is stored. Light cannot be located in these area. The NEC illustration is somewhat difficult to understand. Below are two illustrations front view (looking into the closet) and side view that help define where storage occurs and lighting is prohibited.

Closet Front View – Areas highlighted in pale blue are considered “storage areas” and lighting cannot be positioned in these spaces.
Closet Side View – Areas in pale blue are considered storage and lighting cannot be located in these spaces.

Lighting Placement

Now that the limited areas where lighting can be installed are understood, there are still clearances that must be met.

Distance between an installed luminaire and the nearest point of storageType of Luminaire
12”Completely enclosed LED or Incandescent
6”Surface mounted fluorescent
6”Completely enclosed LED or incandescent recessed can
6”Recessed fluorescent

These dimensions are for ceiling mounted lighting, or lighting mounted on the wall above the door opening.

Surface Mounted Incandescent or LED lighting must be located a minimum of 12″ from any portion of the shaded (storage) area. Light on right side of illustration is located on the wall, over the closet door.
Surface Mounted Incandescent or LED lighting must be located a minimum of 12″ from any portion of the shaded (storage) area.
Surface Mounted Fluorescent lighting must be located a minimum of 6″ from any portion of the storage areas.
Fully enclosed Incandescent, LED or fluorescent recessed cans can be no closer than 6″ from any portion of the storage are (pale blue.)
Fully Enclosed Incandescent, LED or Fluorescent recessed cans must be a minimum of 6″ from any portion of the storage area. On wider closets, remember to check left, right and depth to insure compliance.

Luminaire Suggestions

I recommend LED lighting for closets. The lighting is small, creates only limited amounts of heat and high quality color options are readily available. If the closet is a single-door, small type, there are many surface mounted, very flat options from which to choose. If the closet is wider, linear LED models are available. LED can also be built into the clothing rod, or installed under the shelf, over the rod of clothes. The low-voltage wiring is small and can easily be hidden out of sight.

If an alternative is needed, consider fluorescent. If this choice is made, ALWAYS buy a high quality lamp with excellent color temperatures (CCT) and Color Rendering Index (CRI.)

What Color Light?

This is perhaps the most popular question in all of closet lighting. What color temperature should I use? With only one light source in an average sized closet, use a 3000K color temperature with a high CRI in the mid-80s or above. Whether LED or fluorescent, this will deliver excellent results to virtually all colors in the spectrum.

With larger closets, or customers who have very specific color requirements, two colors could be considered. Perhaps the user has an office with 4000K lighting. They may want to have two light sources installed. Each with a separate switch. When selecting clothes for work, the 4000K switch is flipped. The second switch could be connected to a warmer 2700K source. This color would help in a selection when staying at home, or dining in a restaurant. Two lights would provide the best of both worlds.

As one of the smallest spaces in a home, lighting in a closet may be the most highly regulated and cause the most concern from users. Following these guidelines can deliver good results for each and every closet in a house.