Categories
Technical Lighting Help

A Lighting Guy Rehabs a House – The Bathrooms

This post is a continuation of a series suggested by a friend, detailing the rationale and process of selecting lighting for my wife’s and my new rehabbed home. In this post, I’ll discuss the lighting of the bathrooms.

Prior to this home, we lived in a house that was listed on the National Register of Historic Places, one of 81 French Norman style home built on the former Cleveland Heights / East Cleveland estate of John D Rockefeller, by his son John D Rockefeller, Jr. To remain as true to the original concepts, we made no change to the exterior and very few substantive changes to the interior. Consequently, the bathrooms featured all the original fixtures and tile. This was the bane of my wife’s interaction with the place. It became especially egregious when she broke her ankle. The bathroom was probably the single most significant reason we moved. The amount of steps could definitely arm-wrestle the bathrooms for that title, but that is not the point of this particular examination.

Aside from dealing with a tub, she was also dissatisfied with the lighting. One vanity strip over the mirror was all I could do in each of the four bathrooms. Of course, her face (and mine) fell into shadows. In addition, she was unable to easily shave her legs in the shower. Nighttime bathroom visits could be akin to sailing through the Strait of Hormuz. With a new house, I already had the list of problems that needed solving.

The original main bathroom, altered at some point in the 1980s.

Two Unusable Rooms

The main bathroom in the new house was remodeled at some point in the 1980s with a dark wood vanity. In the last decade a “walk-in” tub was installed. This was an easy decision. We planned to demolish the whole room, “borrow” 18” from the adjoining TV Room and turn it into an accessible bathroom. We moved the door, changed it to a 36” opening and planned for a “wet bath” with no curb, no shower enclosure, grab bars and a built-in bench with handheld shower wand option. If she or I became wheelchair bound, we could stay in the house and stay clean.

Shower cabinet in the original second bathroom (left) with original tile, sink and 70s era wallpaper. Countertop is also likely original.

The second bath was all original. It was a funky blue with a small, original multi-head shower cabinet. The tile was in surprisingly good condition. The sink was okay and the cabinets had seen better days, but we planned to keep it, fix it and revel in its 50s charm.

During the demo, the GC called. The new tub had apparently been leaking…for a long time. The water had rotted through the main joists that supported both bathrooms. It is likely that the original shower cabinet was also leaking. The lead pan under it was deteriorating. They could not save the second bathroom. New floor joists would need to be installed across the entire span, complicated by what the contractor said was a missing support pier. (We noticed sagging floors in the area and that was the reason.) Both back-to-back bathrooms would need to be demolished.

The lead pan under the original shower cabinet was in rough shape, allowing water to leak and destroy the support joinsts below.

We had already agreed to take space from the TV Room, so we now had the capacity for two well-sized rooms. We agreed that my wife would use the larger, accessible bathroom and I would take the (somewhat) smaller one. I sketched out a plan for the divided space, provided a vanity concept that would be used in both and the contractor got to work building his and her wet baths.
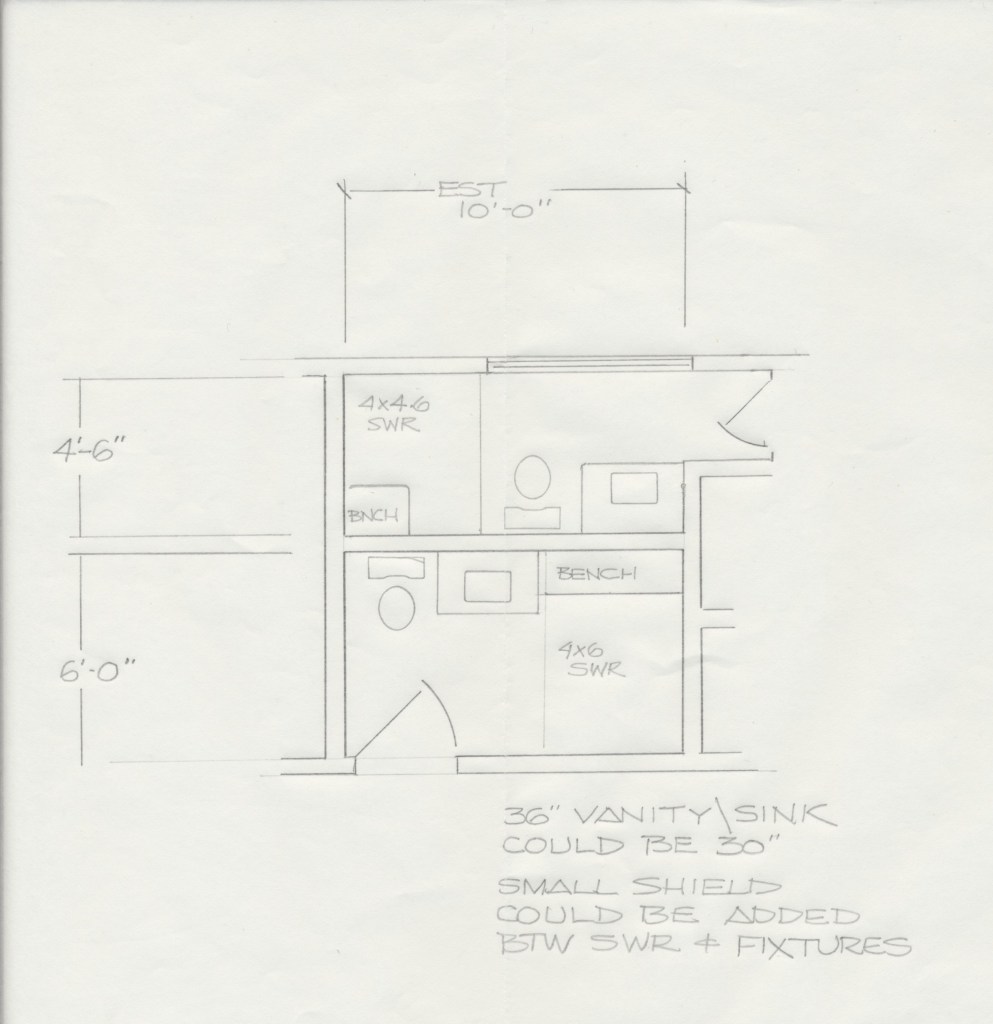
My original sketch on dividing the available two-bathroom space. 18″ was borrowed from the room to the left to make the two room more usable. “His” bathroom at top, “her” wheelchair accessable bathroom on the bottom.
Original sketch for “his” bathroom with floating vanity and pendant lighting. Very little was changed except depth of room and showerhead placement.

Lighting

Over the years, shower stalls have gotten larger and larger, but most still have a single recessed unit overhead. In an approximately 6’-0” wide space, I knew shadows would be a problem, so I specified two medium beam angle recessed cans in each. As in the rest of the house, I used the Nora Sapphire III product.

My wife wanted a blue bathroom. The GC/K&B specialist found a white porcelain with blue veining that she immediately approved. We matched the dense blue to a paint that was used on the vanity and the wall surfaces that were not porcelain. She also wanted chrome fittings.
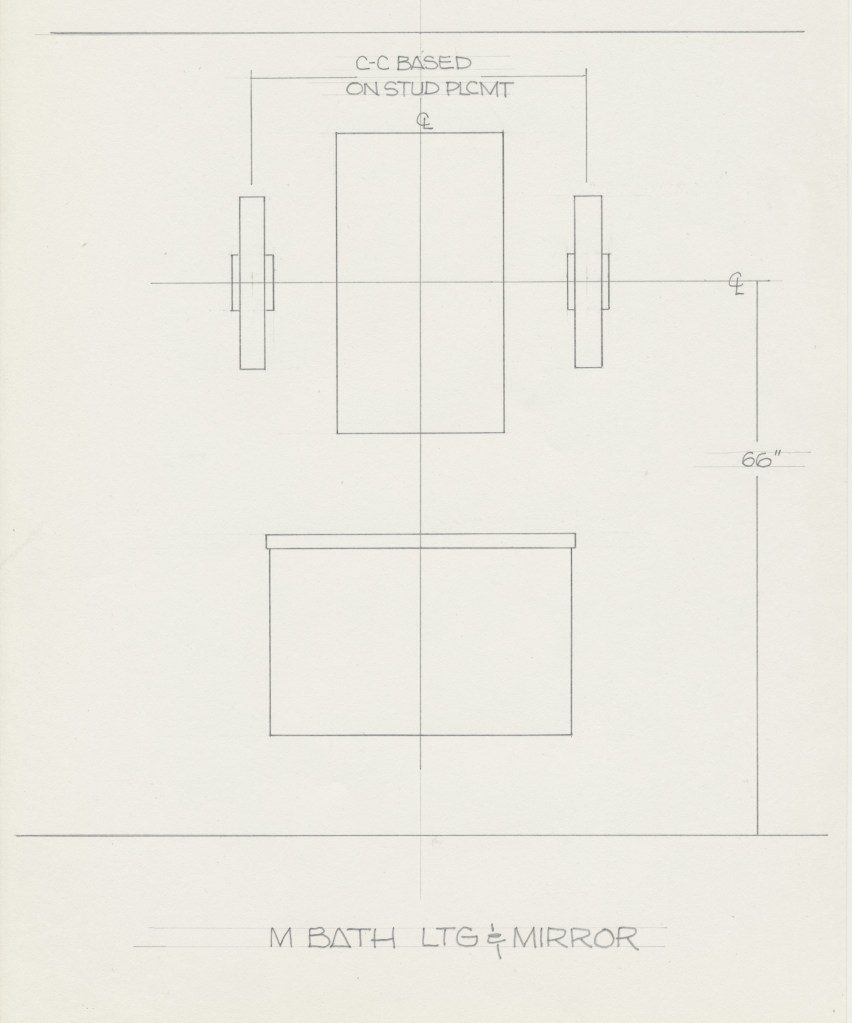
“Her” lighting sketch with outlet box placement instruction for the electrician. I was onsite during box placement to confirm the c-c dimention as it related to the cabinet.

I explained that the lighting would be positioned on each side of the mirror to provide her with the right amount of light, unlike the old place. I’d also include a recessed can over the sink, to deliver light from three directions, thereby eliminating shadows. I had already sketched pendants at each side of the mirror in the bath concept. She told me she did not want pendants, so I gave her a curated list of long linear sconces from which to choose. A quick trip to the local lighting store and she affirmed one of the options, the Modern Forms Vogue 20” sconces.
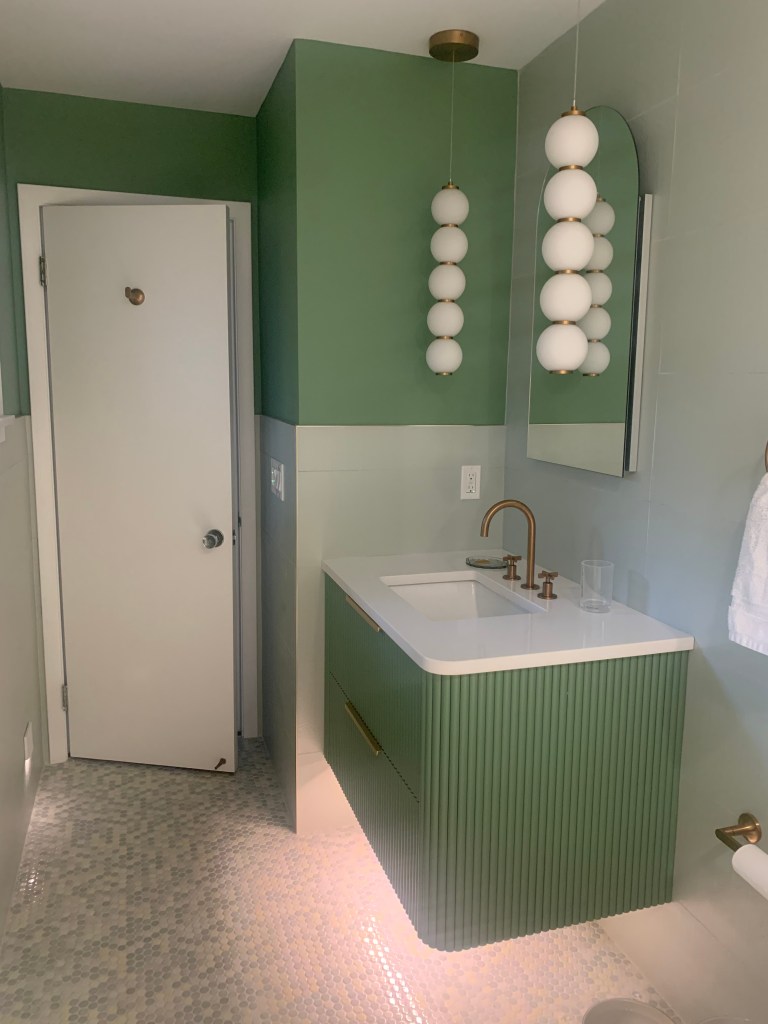
“His” bathroom

I believe green will be the next popular accent color, replacing blue which has enjoyed a great run. I wanted the exact same porcelain as hers, but with green veins. “Sorry. Not available.” Interestingly, there is virtually no green vein or green accented porcelain or ceramic tile on the market. The GC called all of his sources and we visited almost every tile house in the county and found only three options. I found some online, but didn’t want to pick something so important without seeing it live. I finally agreed on a celadon tile with feather vein texture. Unfortunately, they did not make a version for floors, so it took the contractor another month to find a multi-color penny-tile that matched perfectly. To complement the feel of green, I went with brass fixtures and fittings. The lighting I wanted was in my original sketch. The Kuzco/Alora Bijou pendants. I selected the 5” (5 sphere) model because of the tight space to the left.
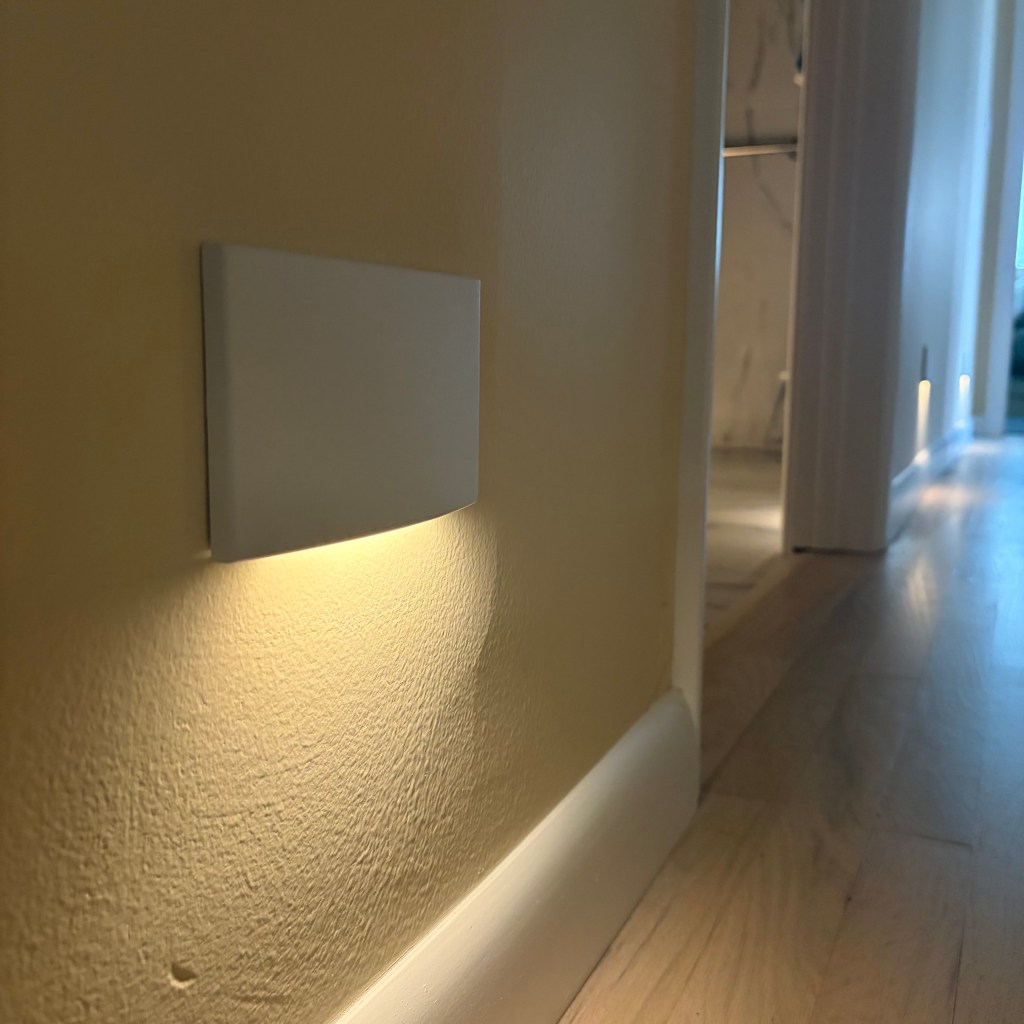
Nightlights were included in the hallway from bedroom to bathroom to create a pathway and insure visibility during nighttime visits.

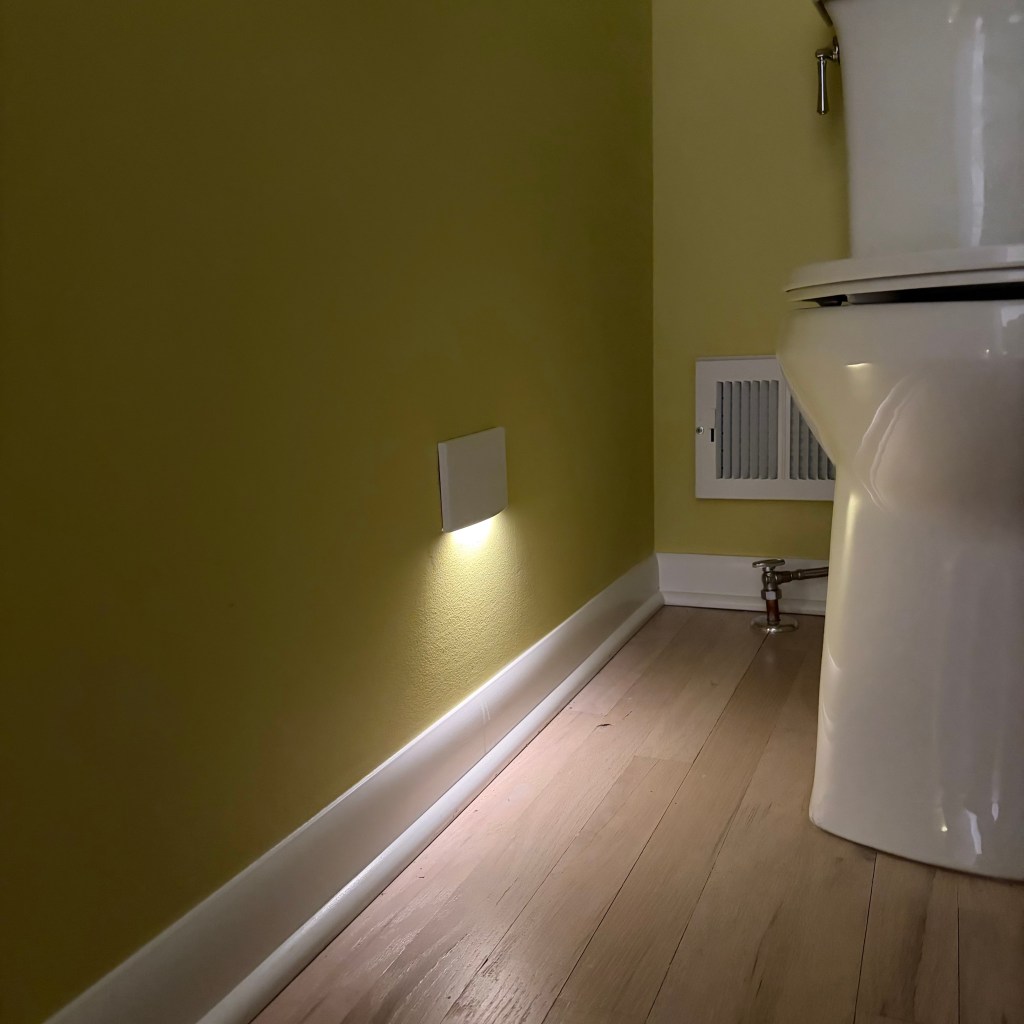
To insure we could safely navigate to the toilets at night, I installed two step lights in each bathroom along with a 24” strip of low lumen output LED Tape under the vanity. In all the bathrooms, (the hall and bedroom, too) I used a full-face WAC step and wall light. The 140 lumens per foot, standard grade tape is from American Lighting.
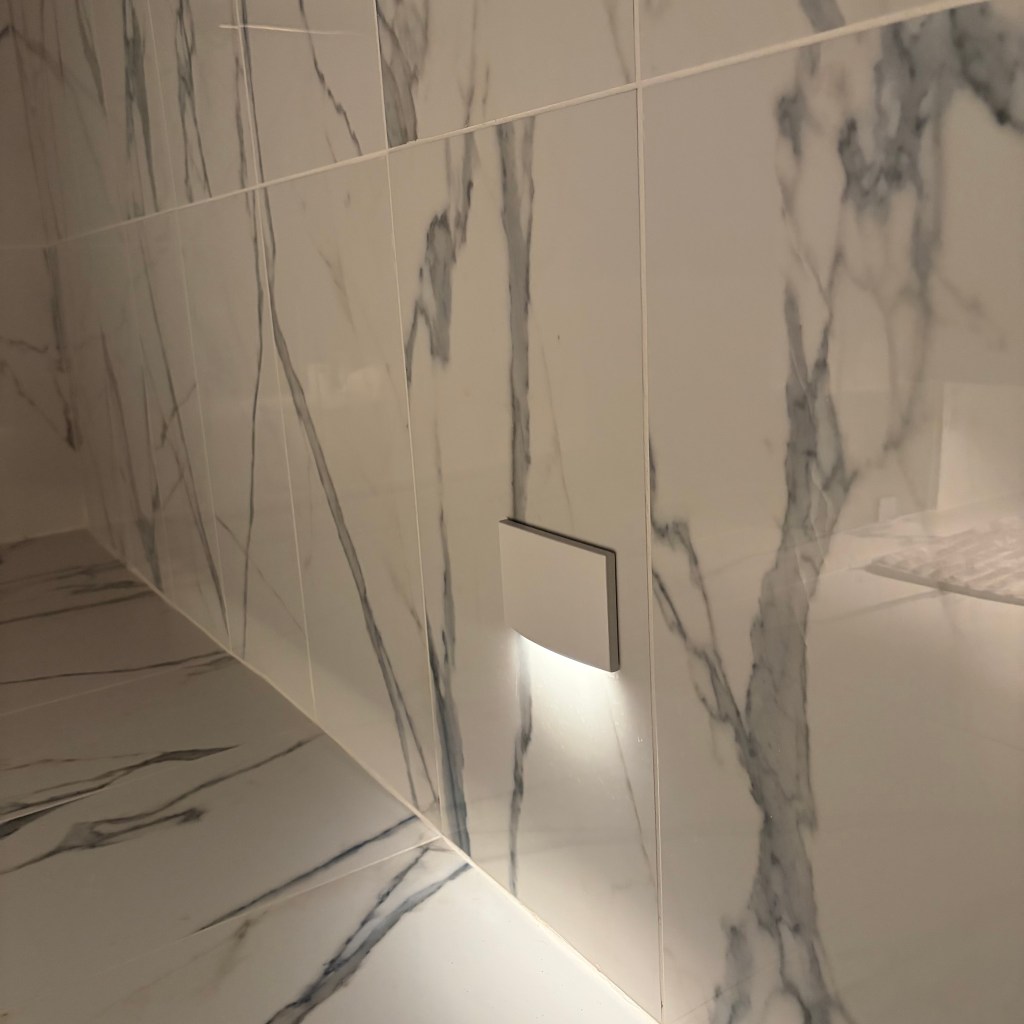
Nightlighting in “her” bathroom

To give us the purest white for grooming, I decided to use 3000K color temperature in both rooms. While I was comfortable with the decision in her bathroom because of the white and blue colors, I was worried that the color would fight the celadon in my bathroom. Luckily, the tile has responded nicely to the 3000K light.

Controls

Each bathroom has four switches. One for the two shower recessed units, one for the mirror sconces plus the over-the-sink recessed and one for the night lighting. A fourth controls the ceiling exhaust fan. The night light switch is part of the Control-4 home automation system so I could configure an illuminated pathway “scene” from the bed, down the hall and into the bathroom.

Illuminance Measurements

My goal was to provide better lighting at the face, and in the shower, in addition to providing better functionality. Nighttime navigation needs only a limited level of light, but delivers a ton of safety. Because the main bathroom does not have a window, the nightlights also furnishes around the clock support.

While it doesn’t matter for her bathroom, I took these measurements at dusk. The sky was clear, the sun had just set, but it wasn’t yet dark, so there is a bit of light coming from the window. (See first line of data.) Because of the wide variety of lighting, I provided a range in the “All Lighting” measurement, rather than an average calculation.

Type of LightHer Illuminance MeasurementHis Illuminance Measurement
Dusk via Window0.0 fc0.1 fc
Nightlight Only – Middle of Room at Floor1.5 fc2.0 fc
Nightlight Only – Middle of Room at Eye Level0.21 fc0.13 fc
Shower Only – Standing at Showerhead at Eye Level46.5 fc36.6 fc
Shower Only – Seated at Eye Level20.6 fc49.8 fc
Mirror Lighting Only  – Standing at the front of the vanity Measured at Face216.0 fc305.0 fc
Mirror Lighting at Center of Sink190.2 fc197.0 fc
All Lighting – General Areas of Room35 fc to 193 fc41 fc to 167 fc

While both rooms are almost the same size in area, her bathroom is a wider, full rectangle, accounting for some of the “lower” levels of light. (seated shower, general lighting) His bathroom is narrower, with a small passageway at the door that adds to square footage, but not usable space.

Her bathroom benefits from a bit more reflectance because of the white field on the tile. It also has a glossier finish. It does lose some of advantage with the deep blue around the mirror.

Her mirror sconces are flat against the wall with an initial output listed at 2139 lumens each. His mini-pendants are away from the wall slightly, thereby closer to the face, delivering about the same output at 2100 lumens, but a higher illuminance measurement at the face.

These numbers, in general, exceed recommendations, but more importantly, they provide us with the right amount of light, where we need it and when we need it.
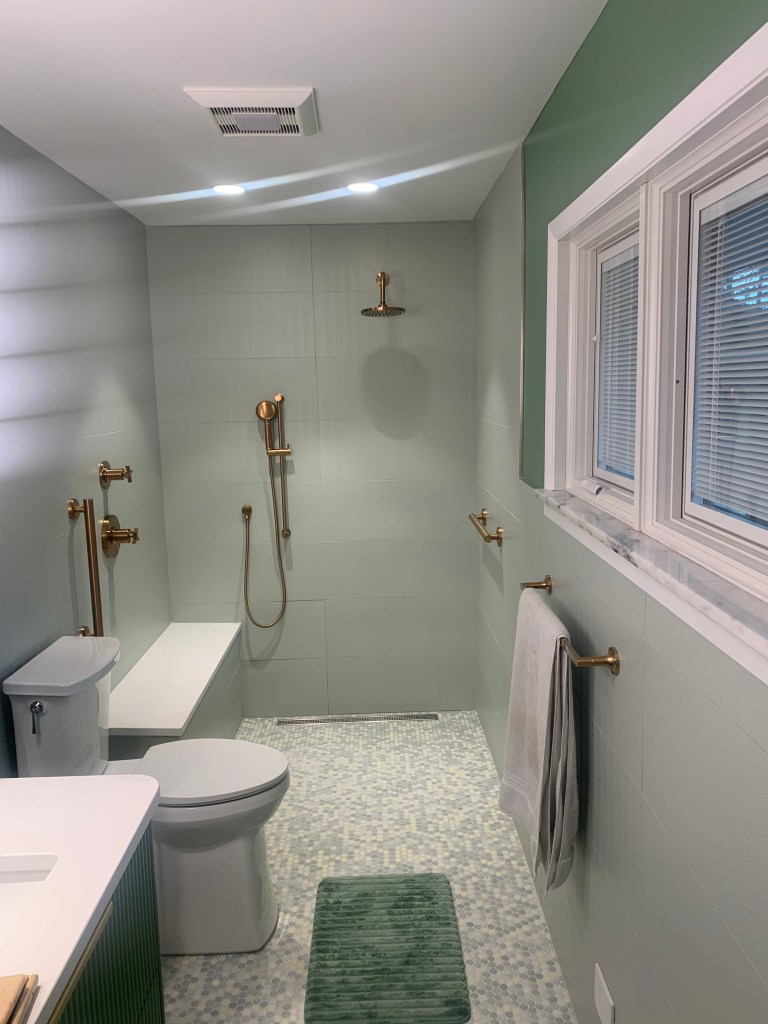
“His” bathroom – shower area with two recessed downlights to eliminate glare

Final Thoughts

With the amount of time we spent preserving the original features in the Living Room, Foyer and TV Room, losing the original small bathroom was tough to swallow. We think we could have made the kitsch work and had a lot of fun with the space. When the inevitable arrived, we decided to lean in and create the most carefree bathrooms we could. With no glass enclosure and no shower curtain, a quick squeegee after a shower and the area is spotless. Ultimately, that was the goal of the house. Twenty-two years of living in a historic property skews judgement. As we age, I’m sure we will appreciate the decision more. After 40 plus years of living in older homes with older bathrooms, it is nice to have a fresh, clean, functional and easy to use bathrooms.
Categories
Aesthetic Lighting Help Technical Lighting Help

A Lighting Guy Rehabs a House – The Living Room

This post is a continuation of a series suggested by a friend, detailing the rationale and process of selecting lighting for my wife’s and my new rehabbed home. In this post, I’ll discuss the lighting of the living room.

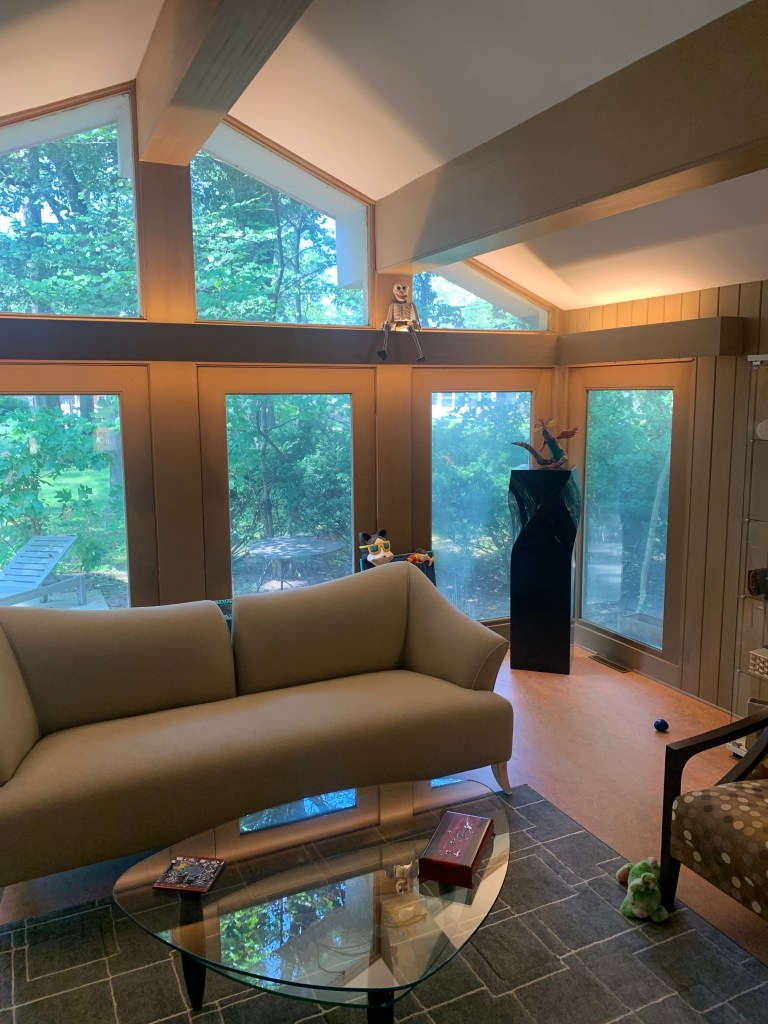
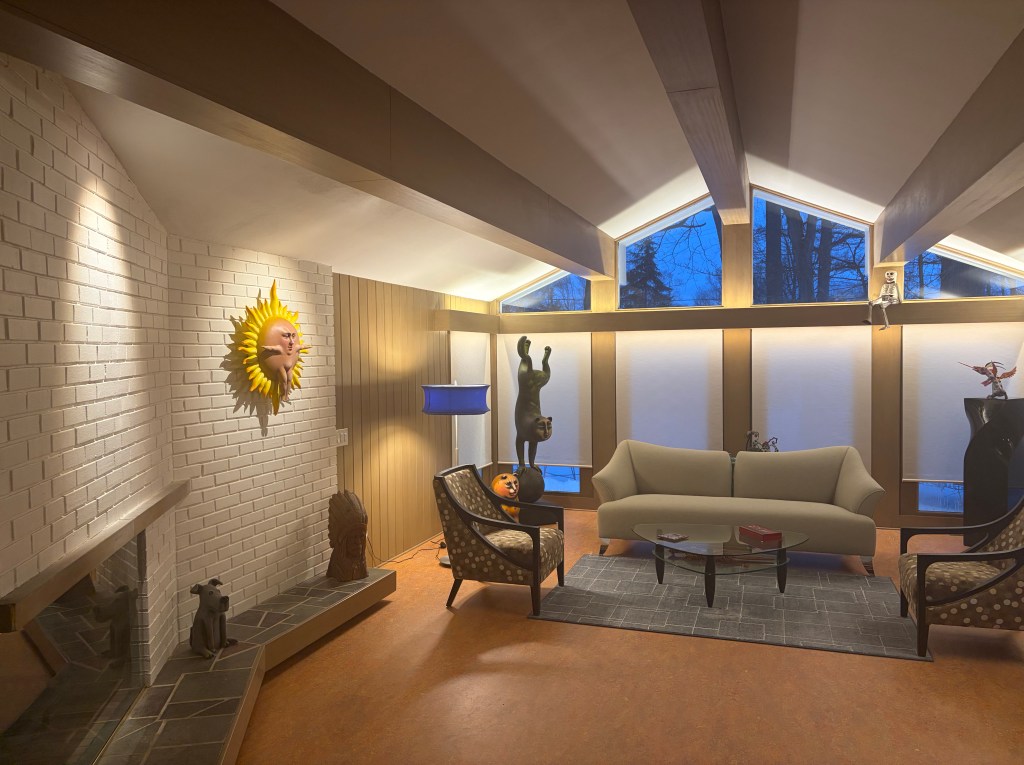
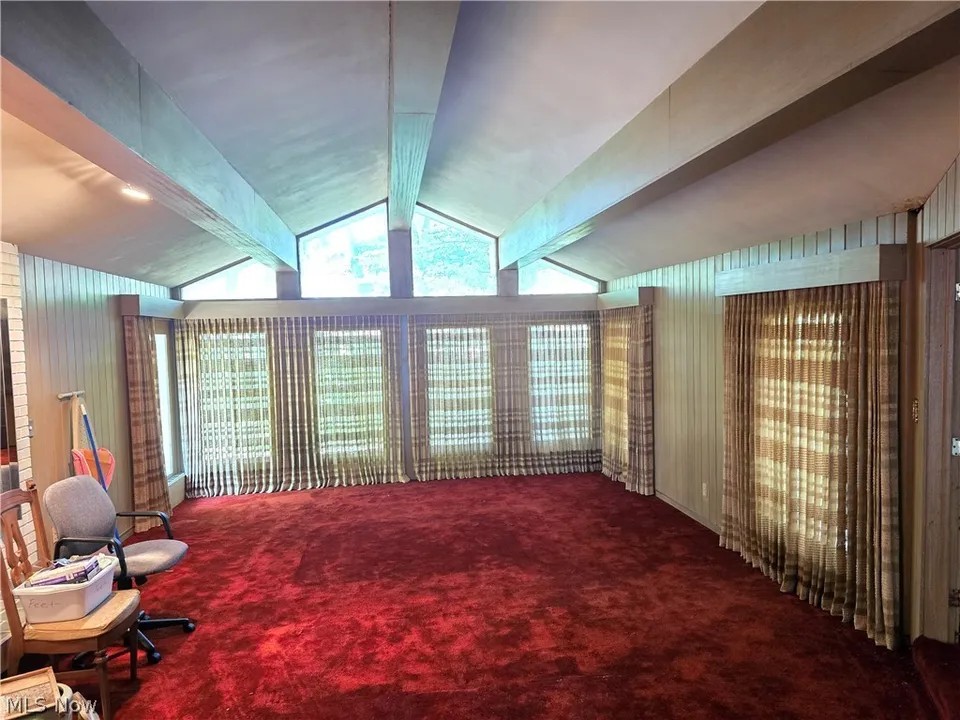
When I first walked into this house, the living room sold me. From the low-ceilinged foyer, you step into an open-beam ceilinged room with a wall of glass at the far end, overlooking a wooded outdoor expanse, unexpected in this inner-ring suburb. My wife says I was blinded by the space. I could see beyond the red shag carpet and ancient drapery that was moments away from shearing on account of its own weight and age. It is an impressive space.

The bad part about buying a neglected house is that nothing has been cared for…for a long time. The good part is, no one has removed any of the original elements of the building. That was the case here. Original hardwood paneling lined the foyer, living room and what we are calling the TV Room. The color was light and fit the home perfectly. The angled fireplace that separated the living room from the adjoining dining room was painted brick. After acquiring a copy of the original blueprints, we affirmed that the wood stain, brick paint and their colors were original to the 1957 construction.

The painter matched the existing stain color. (Actually, he said there were about five colors, certain areas, no doubt victim of UV deterioration. He arrived on an average of the quintet.) We replaced the red shag carpet (don’t shed a tear!) with an orange-toned Marmoleum. Initially, we had planned on a long “S” shaped sofa placed through the center of the room, but with the many cost overruns, we decided to use our existing furniture, at least for a while. We think the room is a welcoming center to our new home.

Indirect Valance Lighting

An original valance was suspended above all of the windows. A flip of the switch ignited about half of the old T12 fluorescent luminaires hidden behind. The second switch lit one of two spots that grazed the face of the fireplace. The options for added lighting beyond portables were limited. I could add a sconce, but I’d need to disturb the original wood paneling. I decided to be as inconspicuous as possible.

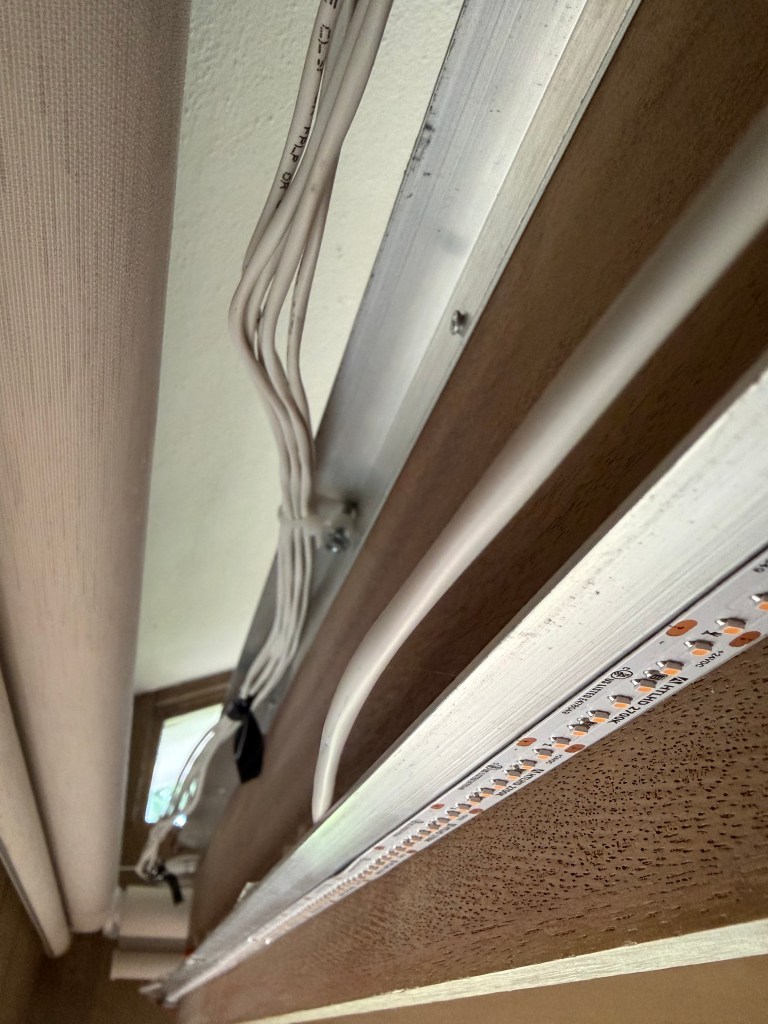
The room is 17’-0” x 25’-0”. (Adjoining rooms cut in at a 30° angle at the foyer end.) I knew I’d need to fill the valance with plenty of light to properly illuminate the area. I asked the contractor to install 1” angle iron across the full backside of the valance, once the old florescent units were removed. I opted for LED Tape across 26’-0” linear feet of valance. I used the American Lighting tape that delivers over 1000 lumens per foot. 26,000 lumen is a LOT of light, even if it indirect, so I decided to use a dimmer. (Yes, I know. Jeff used a dimmer?) While we have come to hate fluorescent light, those old linear units pushed out a ton of light. The T12 emitted approximately 800-900 lumens per foot, so I felt I was on the right track.

We’re not really big fans of drapery and can think of only a handful of rooms in the past, where we’ve used it. Almost simultaneously, we knew we’d be using shades to cover these walls of windows. During the day, they could roll up and disappear behind the valance. At night, when rolled down, I knew that they could pop by grazing the surface with light, aimed downward, from behind the valance. When the GC understood my lighting plan and our desire for shades, he suggested a second run of angle iron at the lower section of the valance. That way, the shade wires could be affixed to the back of the valance between the two “L” shaped brackets that held the lighting. A side benefit was the lack of shadows. This was a great suggestion. I quickly agreed.

I decided to use a lower output for the grazing and selected an American Lighting LED Tape that delivered 310 lumens per foot. I did not run this light the full length of the valance, instead centering sections the width of the shade. A total of approximately 18’-0” was used. 5580 lumens were added. In total, I reached 31,580 lumens of indirect light.

Because of the warm wood paneling, earthy-orange flooring, off-white shades and the bisque paint on the fireplace brick, I knew I needed to use 2700K LED Tape.

Spots

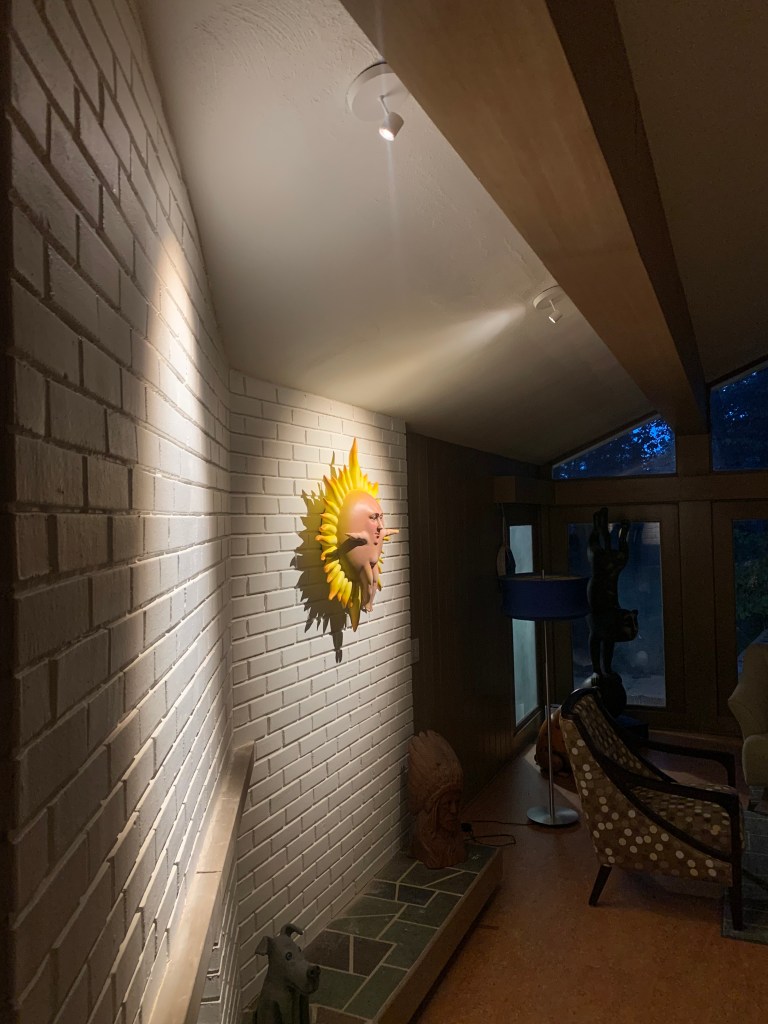
The old reflector lamp spots hidden behind one of the ceiling beams had seen better days. They of course needed to be replaced. They were however perfectly positioned to drive light onto the brick face of the fireplace wall. I asked the electrician to keep the outlet boxes (he still needed to rewire) and selected the tiny WAC Stealth Silo monopoint spots with integrated driver and an adjustable beam angle output. This is a powerful little guy and places the perfect level of light on the first piece of art we have installed in this location. (We still haven’t agree on the second piece!) Like the rest of the room, we used 2700K color temperature to compliment the warm tones of the art, to say nothing of the room and other finishes.

Controls

When we purchased the house, there was a hole in the roof that dumped water into a corner of the living room. Neighbors report that the previous owner kept a bucket at that location to collect the rainwater. That was also the location of the switches for half of the room. After they repaired the roof, the contractor found the support beam at that location was rotted from the constant deluge. They needed to replace and sister all around the area. The switches could not be re-installed at that location. We made the tough decision to cut a slightly larger hole in the original paneling, where the other switch was located. Now, all of the lighting is controlled from one spot.

The Control 4 home automation system drives the valance lighting, in addition to a floor lamp. When we are not using the area, the lamp turns on at dusk and off at 11:30PM. When entertaining a “scene” has been established with the valance lighting at 50%. This is a perfect level of light for a casual, relaxing evening.

Illuminance Measurements

Unlike a kitchen or bathroom, the living area of a home has fewer requirements for tasks, so a relaxed atmosphere is desired. With most of the light delivered by indirect light, that is assured here.

I took these measurements at dusk. The sky was clear, the sun had just set, but it wasn’t yet dark, so there is a bit of light coming from the many windows. (See first line of data.) I averaged measurements from five locations around the sitting area to arrive at number stated here. Measurement at the artwork was in the center.

Type of LightIlluminance Measurement
Dusk via Windows3.5 fc
Floor Lamp Only7.0 fc (spot closest to lamp eliminated)
Valance at 50%8.6 fc
Valance at 100%17.0 fc
Valance at 50% and Floor Lamp15.8 fc
100% Valance, Artwork Spot & Lamp24.8 fc
At Fireplace Artwork68 fc

The IES recommends light levels of between 10fc and 20fc in living areas/social gathering spots. The “entertaining” scene delivers over 15fc. Should we need more, it can be raised to almost 25fc of very comfortable light.

In general, light at artwork should be about three times greater than the surrounding space. We are a bit over this calculation during entertainment, but is on target when the valance lighting is fully engaged. As a result, the art presents well.

Statistically, the numbers are good, but more importantly, it is a great space to sit, relax and enjoy the company of others.

Final Thoughts

When the electrician first looked at this room, he didn’t know how he was going to rewire it. There was no access to the ceiling and the original paneling faced all the walls. What wasn’t wood was brick. The GC suggested all the wiring would need to travel outside and under the eaves, until heading back “inside” in the appropriate spots. Only one small section, near the ceiling spot lights required removal. Power supplies for the LED Tape are in the crawl space and wires take a circuitous route to their final destination. We’re glad so much care was taken. The results are nothing short of amazing. We were able to preserve every single aspect of this 1957 space, but imbed it with 2025 technology. Who says you can’t teach an old dog, new tricks?

Categories
Technical Lighting Help

A Lighting Guy Rehabs a House – The Kitchen

A few months ago I posted some statistics about the lighting in the house my wife and I just rehabbed as our “age-in-place” final home. An architect friend I have known for many years reached out, suggesting I post more about the specific “before and after” aspects of the new property. I told him, in a way, I have done that with a CEU session detailing the whole process, from a lighting standpoint. So why not break it down, room by room, in a written format? This is the first post responding to his good idea.

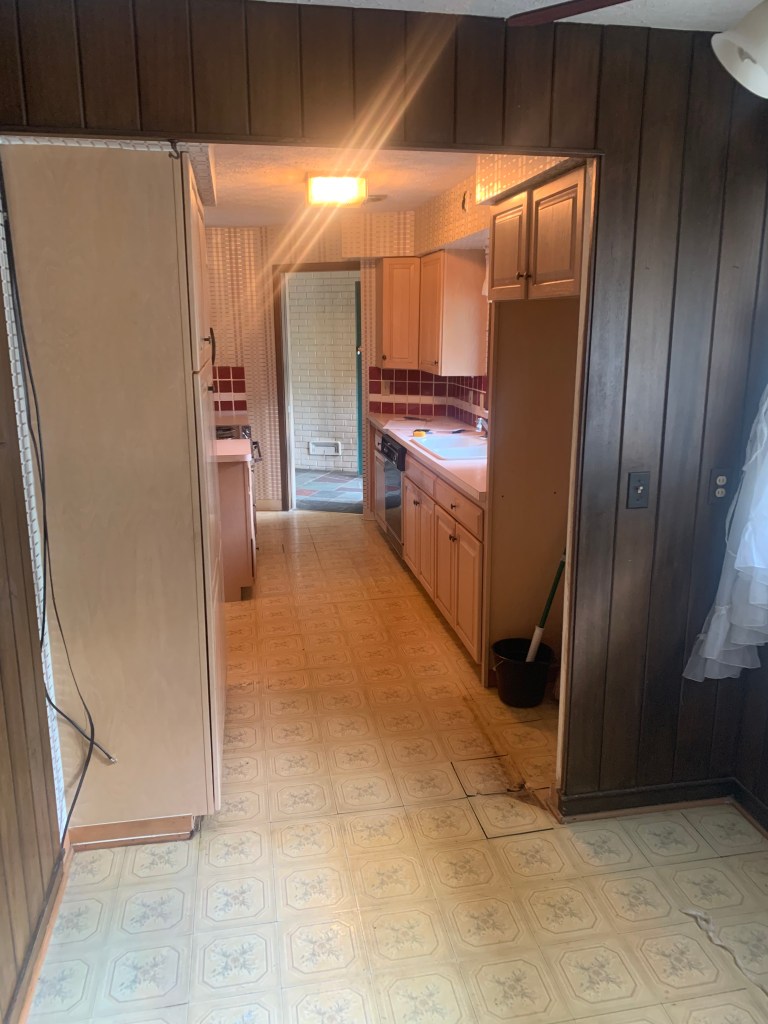
1980s era kitchen when we bought the house. Note the original hardwood paneling that we believe was from the 1950s.

Based on the design, my wife and I believe the kitchen in our new mid-century home was rehabbed at some point in the 1980s. The cabinets were of decent quality, but the overall look was dated and “old” feeling. In the dinette area, the original 1957 solid wood paneling was still in place, but unlike the rest of the house, this wood was stained a VERY dark, blackish-brown. An original sliding glass display case was embed in one wall. We thought about keeping both, but could not rectify their existence with the vision we had for the whole room. The paneling and display case were the only original elements we intentionally removed from the house.

“I want a pink kitchen!”

Many homes in our neighborhood are being flipped. We toured scores of them and they had one thing in common, grey kitchens. I was nonplus, but my wife hated them. Now that she had a clean slate, the sky was the limit.

While working with the cabinet designer, we were shown a sea of wood cabinets options, none of which either of us wanted or liked. We initially figured we’d end up with white, then she told the designer of her heart’s desire. He was startled. Pink cabinets were a new one for him and he was taken aback. The GC jumped in, suggesting painted cabinets as a solution.

“What color, pink?”

“Pink.”

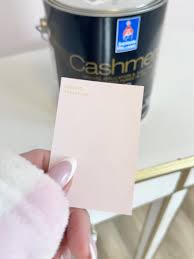
Sherwin Williams #9692 Cotton Candy

The GC and I quickly went next door to the Sherwin-Williams store and we simultaneously reached for a subtle tone of pink, Cotton Candy. We ran back to the cabinet store and showed it to my wife. “Yes! Pink.”

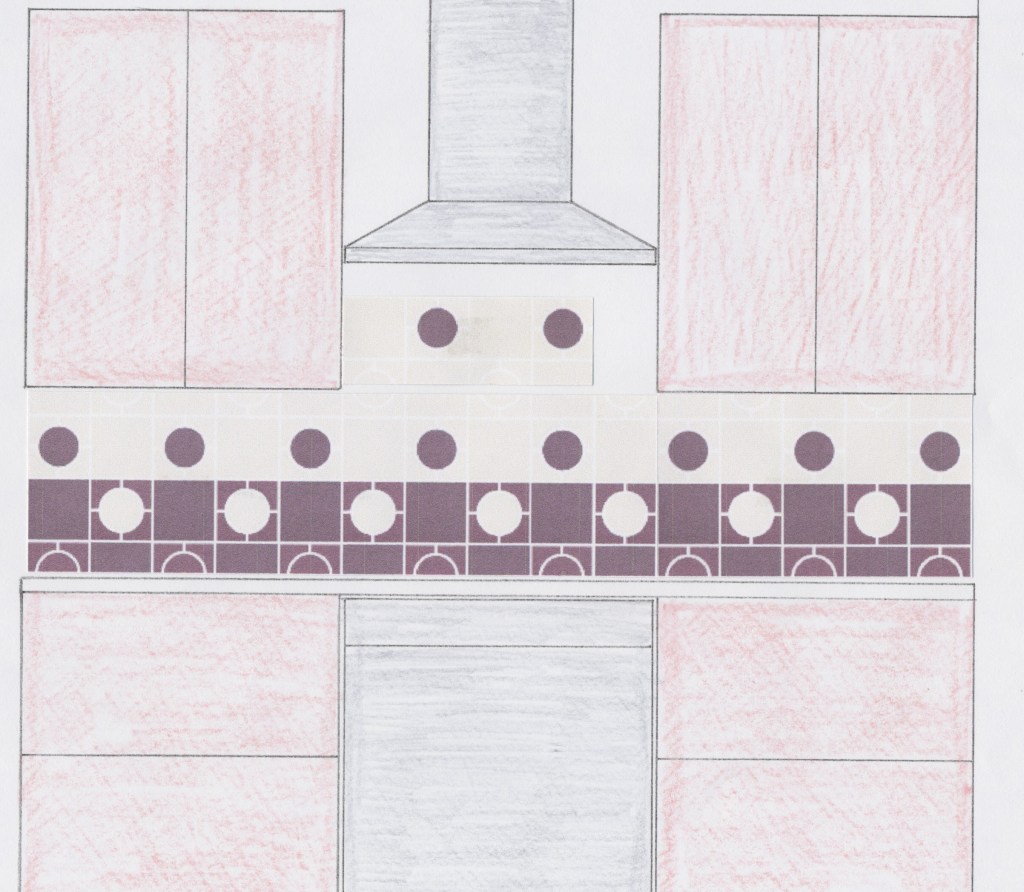
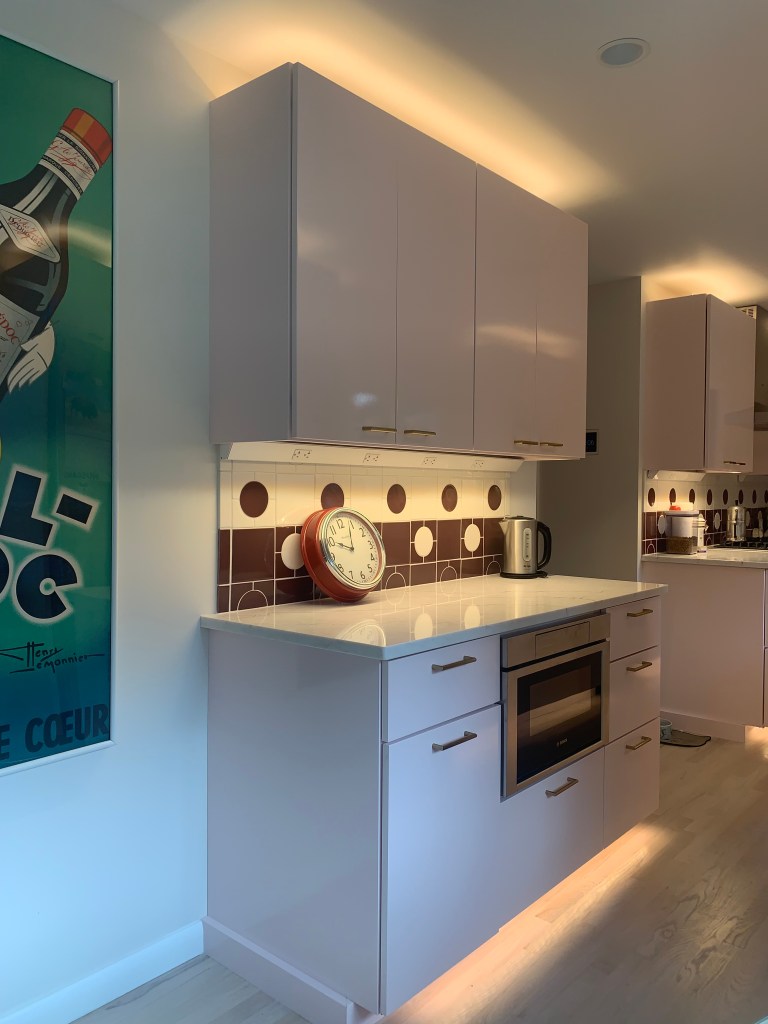
After vising eight granite/stone/quartz showrooms, we finally found a countertop that would match the pink. The backsplash selection was a similar challenge. After we found the color, I designed a dozen pattern configurations and she picked her favorite. Initially, she wanted more pink on the painted walls, but I was able to talk her off that particular ledge. After deciding on blush pleated shades and a bleached white wood floor, I could then concentrate on the important part, the lighting!

One of many backspash sketches I did to secure approval from my wife.
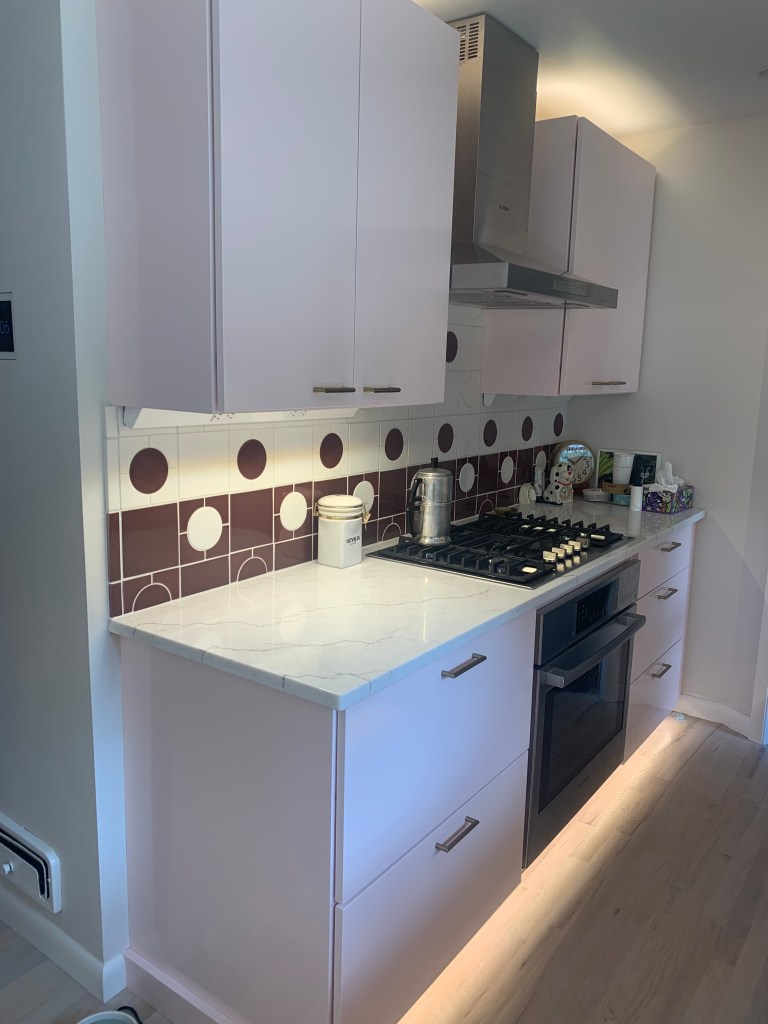
The pink, aubergine veined quartz and burgundy backsplash all work in concert.

Good Lighting

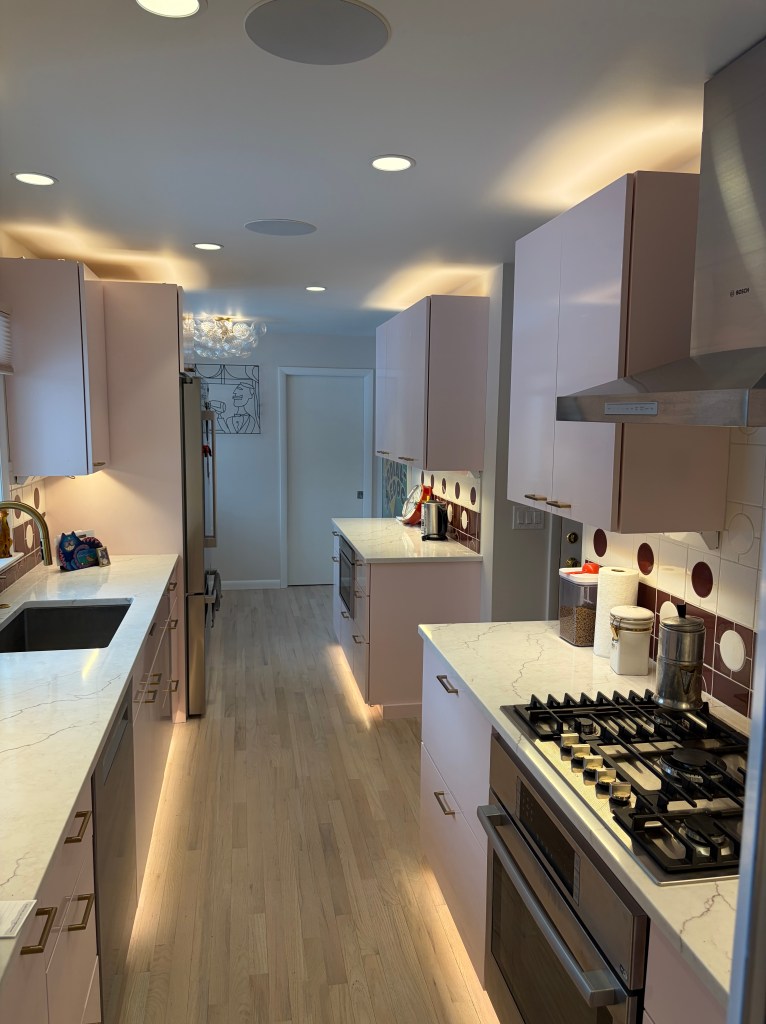
One added trend in all the “flipped” houses we toured was the horrible flat, quasi-recessed lighting used. Almost nothing in new or rehabbed homes is as egregious as the wafer light infestation. Miserable light, that adds glare and doesn’t drop light onto the work surfaces, is not a solution I wanted. I sought out a deep recessed option and found two possibilities, Nora Sapphire III and WAC FQ. Both offered multiple beam angles, lumen output options and assorted color temperatures. I decided to use the Nora brand because they affirmed a 2 ¾” depth and WAC customer service said theirs was, “about 2 ½”.” “About” made me uneasy.

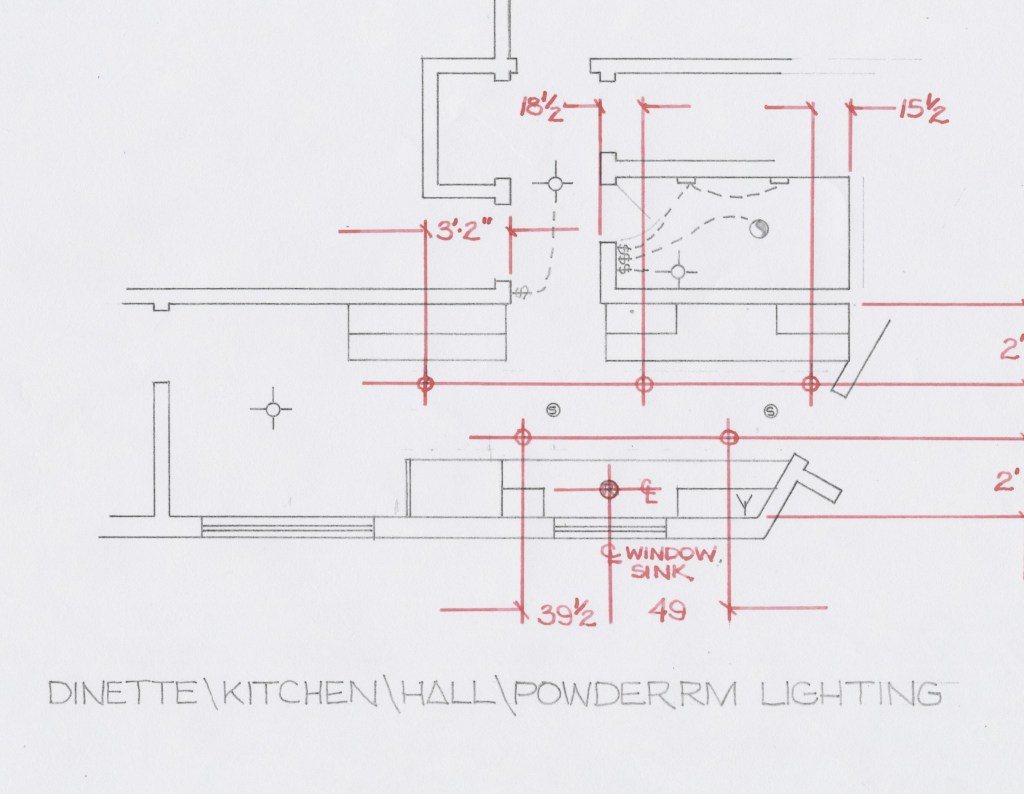
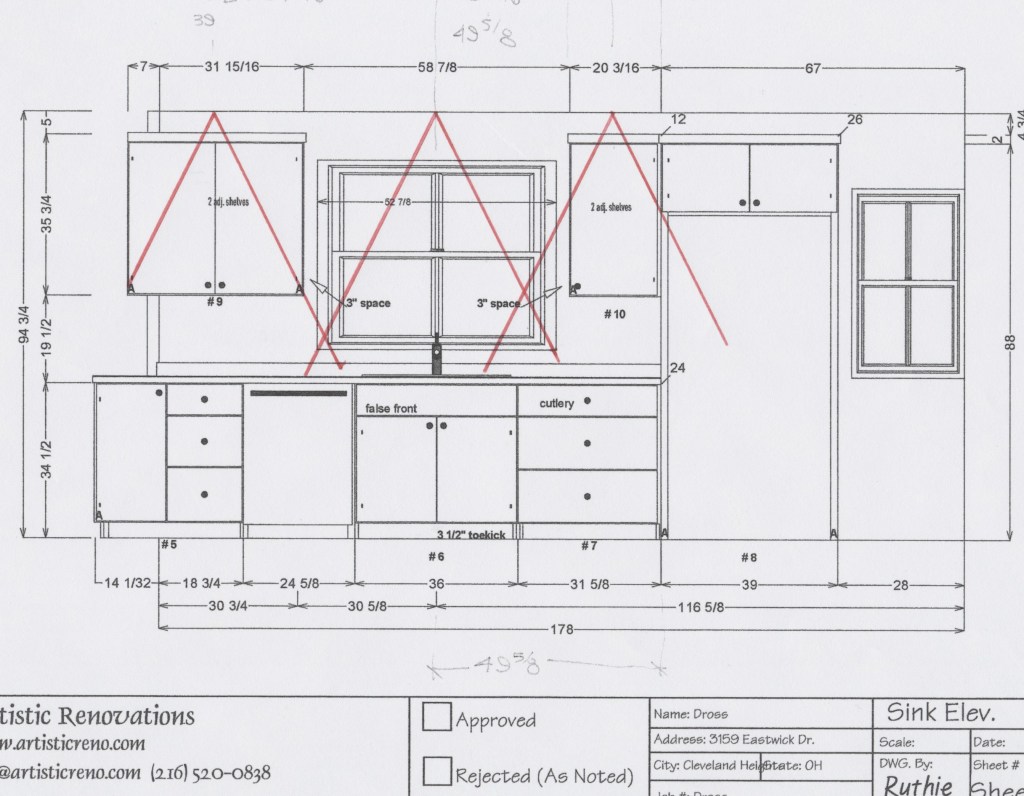
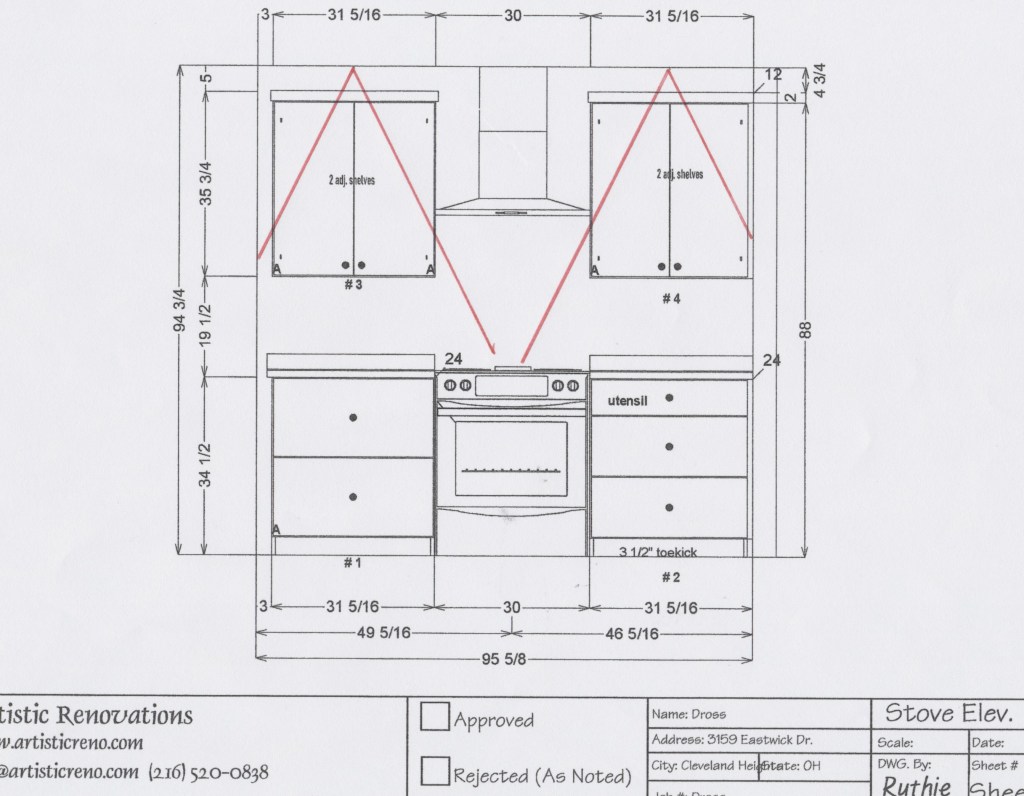
I laid out the recessed placement using both the 38° spot and the 53° narrow flood. Intuitively, I knew the 64° flood wouldn’t give me the illuminance I wanted at the work surfaces. I settled on the 53° option. I also decided on 3000K to insure a great color for foodstuffs and the room finishes. I then provided the electrician with detailed placement measurements for the housings.

These images were pasted all over the kitchen area during construction

LED Tape

I knew I needed an LED Tape manufacturer with a lot of options. I reached out to a number of Lighting Reps I know. Almost all of them told me to check out American Lighting. They were right; they offer multiple output variations, plenty of color choices and even though I wasn’t interested, they manufacture sheets, wet outdoor, COB, dim-to-warm and color-changing product as well. There are different run-length choices and even a 120V alternative.

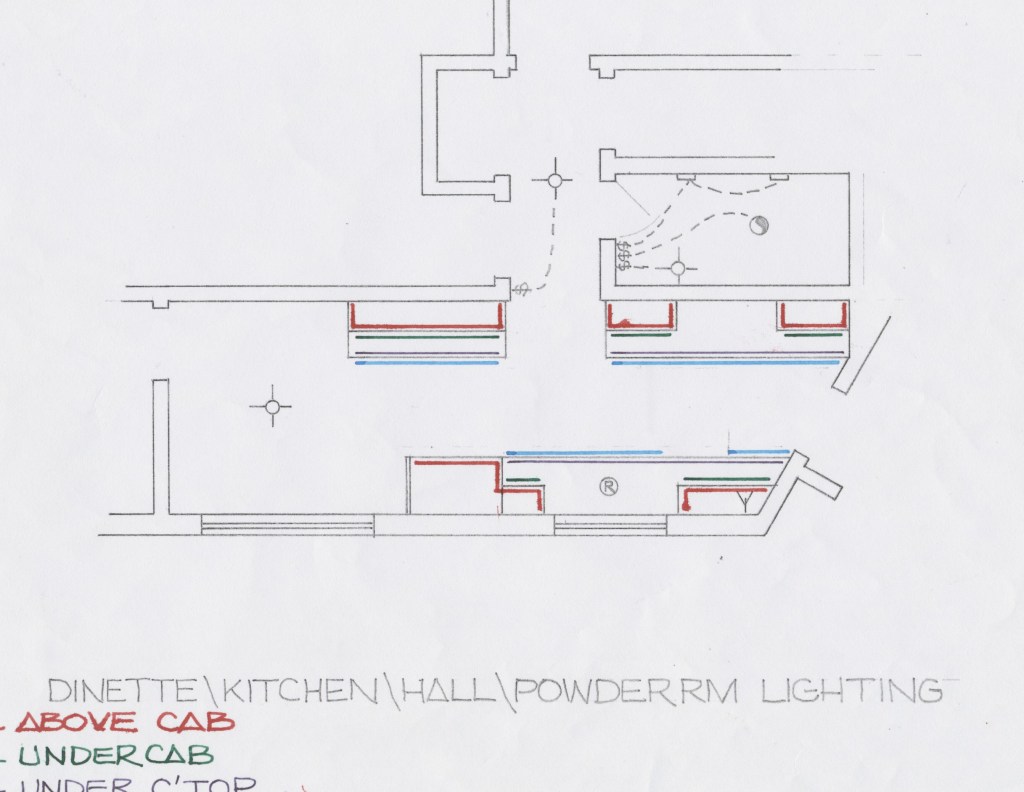
The three layers of LED Tape – Above, Under Cabinets and Toekick – I decided against the under-counter after consulting the cabient and countertop fabricators.

Under cabinet lighting is crucial to good kitchen lighting. I used an LED Tape that pushed out over 1000 lumens per foot for that application. I like to use above cabinet lighting in the morning, so I selected the LED Tape that delivers 310 lumens per foot. This presents a beautiful indirect glow, at the start of each day. Our toekick lighting is on for most of the evening. Not much is needed, so the basic product distributing about 140 lumens per foot was adequate for that job. One vendor, three products and a solid lighting solution.

I personally installed all of the LED Tape. (The power supplies were hardwired by the electrician.) The only problem that occurred was with the connectors. While it does not say so anywhere (that I could find) the connectors are unsuitable for solid-core wire. Unfortunately, the electrician used solid core, Class 2 suitable wire to travel from the remote power supplies to the application position. I was forced to “hide” wire connectors at almost every junction point. This was frustrating and not what I expected. Installation time was tripled. Imagine if I were earning journeyman electrician wages! I hope at some point in the future, they develop a solid core wire connector. American Lighting customer service was of no help either, so that was disappointing.

Decorative

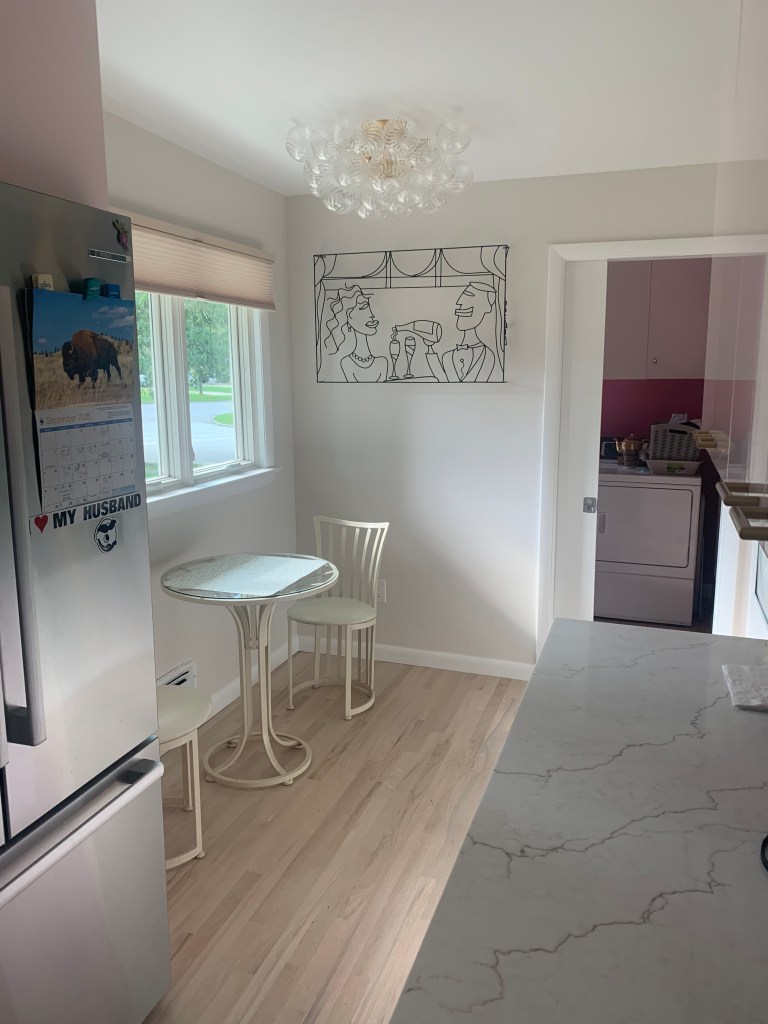
Only one decorative piece was planned for the kitchen. Because the ceilings are at 8’-0” and my wife specifically did not want a hanging pendant that could interfere with normal room navigation, we decided on a semi-flush and we wanted it to be a decent diameter. To maintain the theme of circles started by the backsplash, we sought out a unit with spherical diffusers. After considering a few others, we decided on the Visual Comfort Talia. I installed 2700K lamps to create a warmer glow from the layers of clear glass and gold frame.

A large semi-flush became a more practical option because of the walkway to the adjoining laundry room (painted “Hot” pink!)

Because I installed all of the lighting, I did appreciate the comprehensive instruction sheets and the “spare” glass baubles. While we are currently using a small café set we bought for our first remodeling project of a 9’-0” x 10’-0” kitchen, three houses ago, we think it will allow us to grow into more meaningful space in the future.

Controls

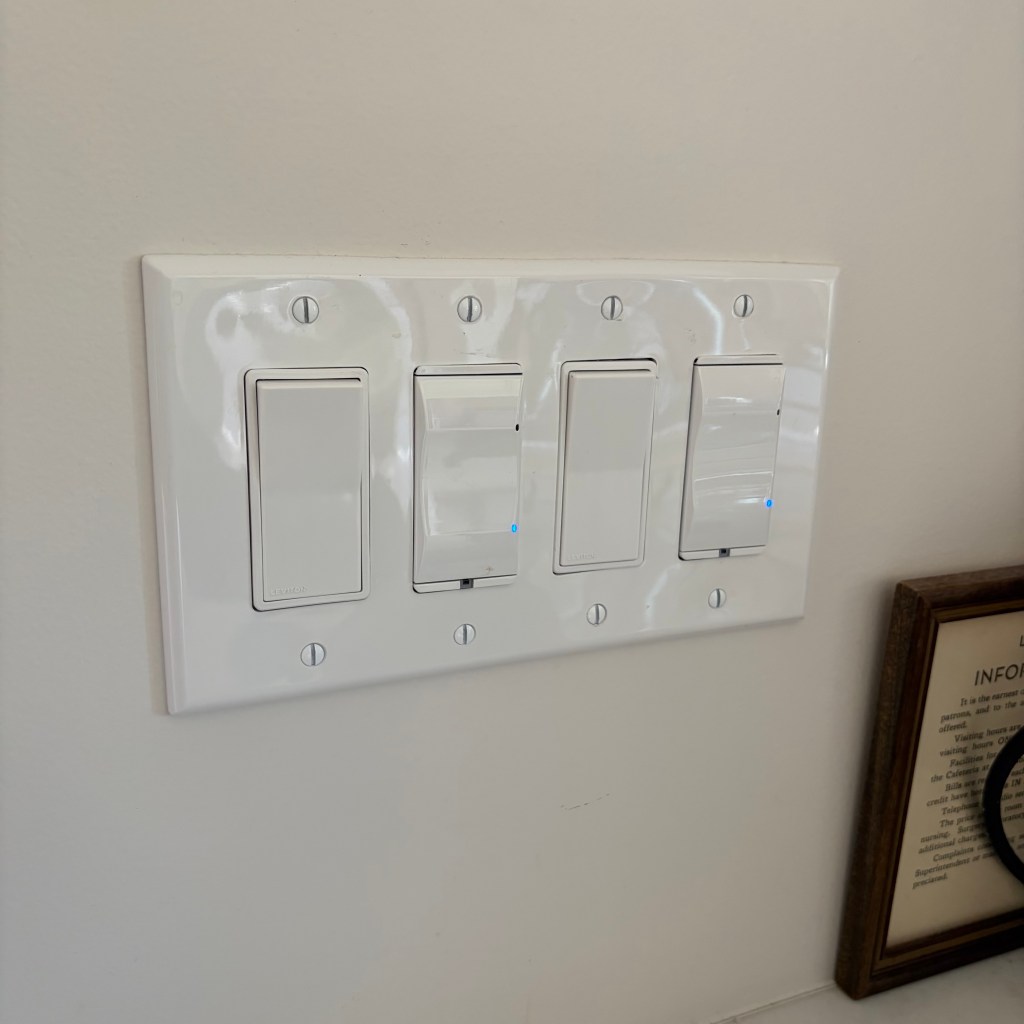
Our house is controlled with a Control 4 home automation system. We’ve tied the toekick and above cabinet lighting into the system. The toekick lighting functions as a nightlight from dusk to 11:00PM. We have not yet imagined a scenario for the above cabinet lights. Should the desire arise, we can upgrade to controllable switches for the recessed, under cabinet and dinette area lighting, but we do not yet see the need.

Switches are arranged from ceiling, down. Recessed, over cabients, under cabinets and toekick. The Over Cabinet and Toekick switches are linked to the C4 home automation system.

If you read my blogs, you likely know I don’t use many dimmers, especially in the kitchen. With four switches in the room, I can establish 24 combinations. Do I need more? It is unlikely. By selecting one of the 24, I have exactly the right amount of light.

Illuminance Measurements

How much light is enough light? In the last house, we existed for about six years before we rehabbed the kitchen. That meant BAD lighting for a long time. We also understand that old age means more light will be needed. Once you have good kitchen lighting, you cannot go back.

I took these measurements at dusk. The sky was clear, the sun had just set, but it wasn’t yet dark, so there is a bit of light coming from outside. (See first line of data.) I averaged measurements from five locations on the 17’-0” liner feet of countertop and backsplash to arrive at the number stated in the chart.

Type of LightAt Sink (located in front of window)At Front of CountertopCountertop at Backsplash
Dusk via Windows17.0 fc1.86 fc1.02 fc
Recessed Only109.0 fc81.66 fc19.0 fc
Under Cab Only38 fc247.6 fc318.4 fc
Above Cab Only29 fc21.06 fc7.96 fc
Recessed & Under Cab *136 fc334.0 fc323.2 fc
All Lighting On **150 fc338.2 fc333.4 fc

* Most popular option for cooking

** Rarely used

As you can see from these measurements, the layered approach to light really makes a difference. Consider the following:

  • While the recessed lighting delivers an adequate level of light at the front of the countertops, darkness looms at the work surface near the backsplash
  • With only the recessed light, shadows are a concern on the countertop. Hence the need for other lighting emanating from a different direction.
  • Conversely, if the under cabinet lighting is used alone, the countertops are well lit, but the remainder of the room, not near an upper cabinet (see sink) is left in the dark.
  • Toekick lighting which delivers about 150fc on the floor, under the toekick and 17fc on the floor, 2” from the toekick edge, do not add an appreciable level of light to the work surfaces.
  • The over cabinet lights, likewise add only negligible levels of light to the countertops (compare last two lines of stats, the difference being the addition of upper and toekick lighting)
  • This means the toekick lighting and the above cabinet lighting perform very specific tasks. Crucial nighttime navigation and supplemental lighting as the morning light breaks. In addition, they carry a much heavier aesthetic load, especially when used together during times of entertainment.

In these numbers, it is easy to quantify a statement everyone in the lighting industry says repeatedly. For proper illumination, multiple layers are needed.

Final Thoughts

I had intended to include under-counter lighting to wash the front of the lower cabinets and illuminate open drawers. I included them in the previous house and found them helpful, but the design of the cabinets and placement of the countertop would have rendered them somewhat ineffective. I abandoned the idea after a few conversations with the fabricators. I also elected to use ceiling mounted audio speakers after realizing the minimal exposed space above the cabinets. Our previous house had 8’-5” ceiling heights. (Yes, I know. Odd.) With so little space, I decided to place the bookshelf speaker in another room. That meant two more holes in the ceiling. Statistically, we have the right light. We also feel we have good lighting that meets our daily needs.

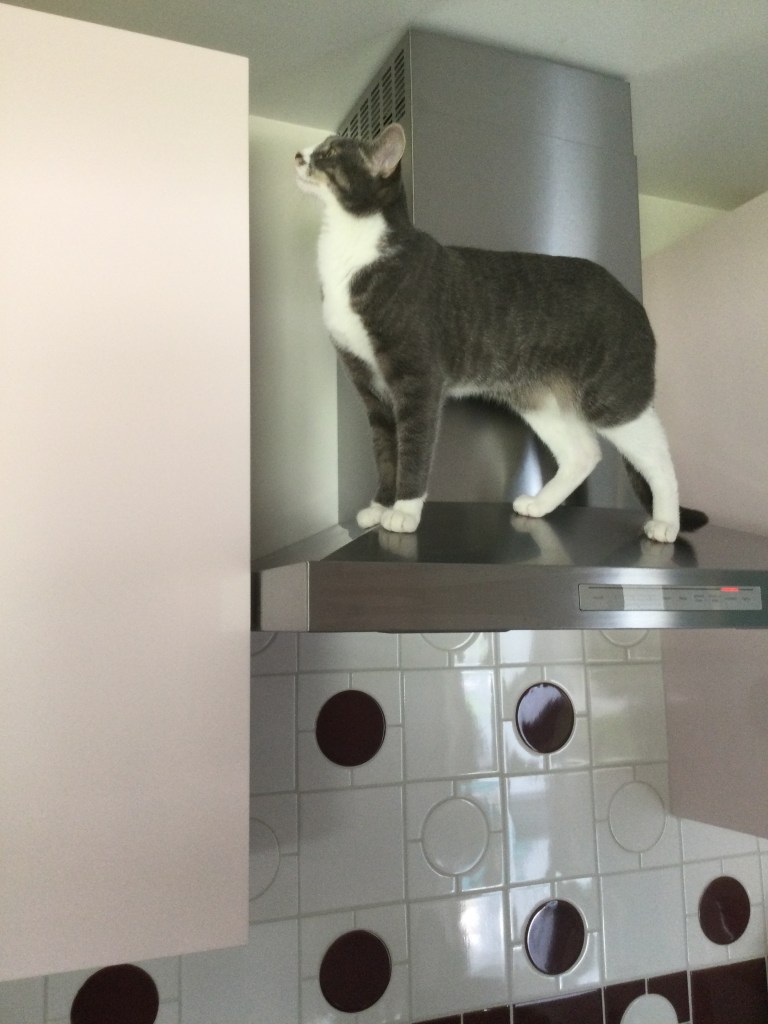
Our cat, Kit giving everything a final inspection!

Upon closer inspection, even our cat, Kit agrees!

If YOU have any thoughts, I’d love to hear them! Look for additional posts covering other room throughout 2026.

Categories
Technical Lighting Help

Does Energy Certified Lighting Really Save Energy?

In my last blog post, I provided some building stats on my wife’s and my new rehabbed home. I also indicated that, despite being well lit (in my opinion!) it did not meet many energy efficient watts per square foot standards.

To achieve LEED certification for a residential property, a lighting power density of 1.1W per square foot is the minimum. (I did reach this benchmark.) By decreasing the power density, points are awarded. The more points awarded to a home, the higher the LEED certification. If I bring the power density down to 0.72W/Sq. Ft. I could earn 0.5 point. 0.60W/Sq. Ft is awarded 1.0 point and a power density of 0.48 would earn me 1.5 points. These accumulated points allow one to earn higher levels of certification.

If I would have reduced some of the lighting I could have easily meet the first tier LEED requirements of 0.72, but then, the impact would have been reduced. This point has begun to upset me. I understand that it is possible that some homeowners might always turn on all the lighting all at once, so the only fair assessment is to include everything. That is unfortunate because that is not how most people live in their homes. Lights go on and off as needed, where needed. With fewer options, the higher consuming luminaires will always be used, thereby using a larger quantity of power than one which offers the homeowner choice.

Let’s take three examples of the shortsightedness of total lighting power consumption in the kitchen, bathroom and outdoor lighting.

Kitchen

The kitchen is a galley design with a dinette at the far end. It measures 7’-6” x 23’-6” or 179.36 square feet. The room has an 8’-0” ceiling height. I placed a large semi-flush decorative unit over the dinette. In the food preparation area, I used six recessed cans, undercabinet lighting, toekick lighting and lighting over the top of the cabinets. Each are controlled separately. The LED Tape has a different lumen output for each location.

TypeQuantityWattage EachTotal Wattage
Recessed611W66W
Undercabinet13’-0”7W / Ft.91W
Above Cabinet25’-0”3.65W / Ft.91.25W
Toekick25’-0”2.19W / Ft.54.75W
Dinette113.2W13.2W
Total  316.2W

Using 316.2 watts of electric to illuminate 179 square feet puts the efficacy at 1.76 watts per square foot. Still within the average, but well above the LEED cutoff and nowhere near the optimums of 0.7 to 0.48. That number supposes all lights are engaged at all times. In the year we have lived in the new house, we can think of no time when all five switches were live. There are multiple illumination options for a reason.

When I wake in the morning, I like the above cabinet lighting. I do not turn on anything else. The indirect glow is relaxing and easy. That means, I’m using 0.51 watts per square foot. My wife only uses the undercabinet lighting, consuming the same approximate levels of electricity. When cooking, the overhead recessed lighting and undercabinet lighting are both used and result in the heaviest consumption in the room at 0.88 watts per square foot. In the evening, only the toekick lighting is employed, demanding just 0.31 watts per square foot.

What’s more, the toekick lighting is used for the greatest amount of hours, controlled by the home automation system to turn on at dusk and off at 11:00PM.

Ignoring the dinette area for a moment, if I didn’t have four switches controlling four different light options, I would most likely need to increase the output of the current cans or select a different recessed cans with a smaller beam angle, then use more of them. When the current units are supplemented with the undercabinet lighting, it is the perfect placement and level of light for food preparation, but if I removed the under cabinet tape to meet LEED, I’d need a bit more output from the ceiling. I could use the more powerful 16W unit with the same beam angle. Conversely, I could specify a unit with a shallower beam angle which would deliver a higher level of light on the countertops. Not perfect, but ok. Using a narrower beam angle would however mean nine units, plus the dinette. That total of 112.2 watts delivers 0.63 watts per square foot. (Swapping the six to a higher output option would deliver something similar.) By eliminating light layering and the energy saving toekick lighting, I can now qualify my lighting for the higher level LEED certification, but would I want to? The energy consumed calculates to less, but in practice, we’d have no option but to always use all the light. I’d only have one light switch! That means, in practice, the higher “LEED” qualified lighting option would require more electricity than a good layered lighting design. I can’t imagine that was their intent.

Bathroom

My wife and I believe the secret to a happy and successful marriage is separate bathrooms. In the new house, one (hers) has been designed for wheelchair accessibility. Regardless, they are lit essentially the same. I used mini-pendants to flank the mirror, she wanted sconces. Painted surfaces, while different colors, are both deep, rich colors. Her porcelain tile is basically white with deep blue veining. My tile is celadon, so she benefits from a touch more reflectance.

Her bathroom is 11’-0” x 6’-0” (66 square feet.) My bathroom is the same length but 5’-6” width, with an extra opening space at the door, so my area is 67.8 square feet. Each shower area is lit with two recessed cans. The mirrors are flanked by the decorative pieces; a recessed can is mounted directly over the drain. Under each vanity is a strip of LED Tape connected to two step lights for nighttime navigation.

TypeQuantityWattage EachTotal Wattage
Recessed311W33W
Mini-Pendant (His)224W48W
Sconce (Hers)233.9W67.8W
Step Lights24W8W
Under Vanity2’-0”2.19W / Ft.4.38W
   93.38W / 113.18W

93.38 watts illuminate 67.8 square feet of my bathroom for an efficacy of 1.38 watts per square foot. Because she chose different lights at the mirror, her bathroom needed 113.18 watts to support 66 square feet. Her power consumption is 1.71 watts per square foot.

Like almost everyone, bathrooms are fully illuminated for less than an hour each day. Shower, personal grooming and you’re out of the room. From that point, there are only periodic visits. One of the most common accidents for seniors is falling and it is most chronic during nighttime visits to the bathroom. We all think we know the way, but nonetheless, falls occur. A curled-up cat, a stray ball of that day’s socks tossed on the floor and balance is lost. Having low-level light and a clear path from bed to the bathroom is essential as we age. In our scenario, the under-vanity and step lights are the hardest working fixtures in the bathroom. They consume a miniscule 12.38 watts of electricity, but can be lifesaving.

If I were trying to reduce my total home wattage consumption, these would be a great candidate. Honestly, from a cost perspective, the LED Tape is a good candidate, too. To run the strip of light under each vanity, I needed a power supply. The low-output tape is inexpensive, but most manufacturers sell only a 30W power supply as the smallest option, so a lot of money is needed to prevent a nighttime fall. Because the power consumption is so low, it won’t help the efficacy much. I’d likely need to remove something else, perhaps one of the recessed lights in the shower area and also eliminate the recessed unit over the sink. I could also replace the two flanking lights at the mirror with a single over-mirror option, That would probably get to the reduced power levels for acceptability.

While it saves energy, it runs counter to good lighting practices. The older eye is very sensitive to glare and becomes more so as cataracts become worse. Lights flanking the mirror are one of the best ways to ameliorate the impacts of glare. Light from three directions avoids shadows, making personal grooming easier. In larger shower areas, one light introduced more shadows and does not provide adequate illumination, hence the reason for two. We could eliminate some of the light to meet efficiency goals, but the price paid is not really worth it. Again, to achieve a higher level of efficiency and earn LEED (or some other standard) certification, poorer quality lighting is needed and more electricity will likely be consumed.

Outdoor

The surface mounted lighting on the exterior of our “Y” shaped ranch consists of two types. Recessed units are positioned under the eaves, over all the doors around the perimeter and a few additional places. Articulated spots are located in four other areas.

TypeQuantityWattage EachTotal Wattage
Recessed1011W110W
Spots430W120W
Total  230W

Exterior lighting is gaining more regulations, almost on a weekly basis. The state of Maine just introduced some of the toughest Dark Sky legislation in the country. A Hawaii law is on the horizon. Less light and less offensive, or visible light will be demanded in the future.

I included these, because of their home automation control. The home security cameras are linked with the lighting, so 99% of the evening, they are off. When the camera detects a human or an automobile, I have them configured to activate. Activation is also geographic, so if a car pulls into the driveway, the spot over the garage illuminates. If a human is detected in the western back patio, the light over the dining room door turns on. If a person appears on the bedroom patio, the lights at that door are energized. For most of the evening, they are dark. Interlopers are the only reason for their use. From an energy saving certification standpoint, I’m consuming 230W of power. From a realistic point of view, that is only the case if a bad-guy decides to intrude at night and then, only a portion of the 230 watts will be consumed.

I could have sealed up all of the recessed eave lighting and removed the outlets that service the spots. This would have given me a more efficient home, but we would not have the “bad guy” deterrent the automated lighting provides.

I love the idea of energy savings. I want the country to be less reliant on fossil fuels. I’m OK with mandates to reach those goals. I am, however, a lighting guy. I’ve spent the larger part of my career trying to get people to use better lighting solutions. When those worlds collide, I want to find resolution. Is there a way to combine better lighting with these important efficiency demands? Could the inclusion of a home automation system trigger provisos covering light source use? Could lighting, used primarily as nighttime navigation be removed from calculation? I don’t want to sacrifice good lighting for efficiency, especially when I know, the efficiency measurements will actually demand extra electric use. That’s just not right.

https://www.usgbc.org/credits/homes/v4-draft/eac13?return=/credits/homes/v4

Categories
Technical Lighting Help

The Lighting Industry’s Response to Current US Energy Policy

Here are a few realities about US electricity.

  • The US federal government has pulled its support or hindered alternative power sources such as solar, wind and battery.
  • Inefficient and dirty coal-run electric power plants are regularly being decommissioned. Natural gas fueled plants are also shutting down. Some for these two reasons, others because they are simply at a natural “end of life” and can no longer function properly. Most are not being replaced.
  • Electric demand is on the rise, primarily from data centers being added to support an Artificial Intelligence (AI) boom.
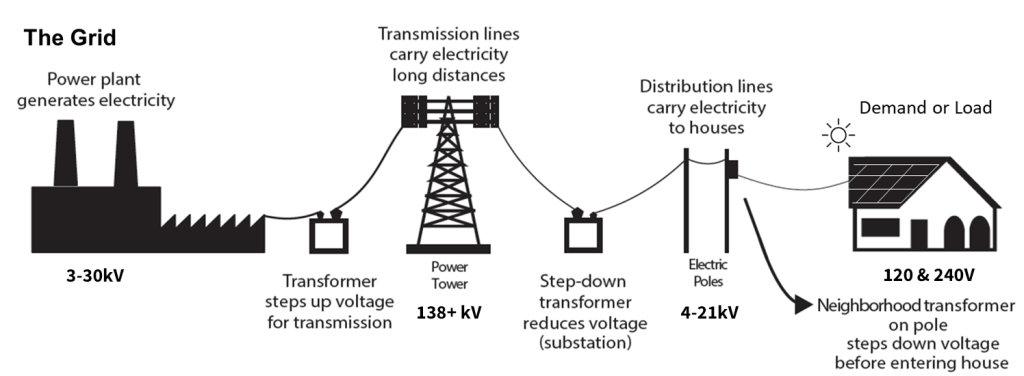
  • The rest of the US electric grid (substations, high-voltage transmission lines and local distribution lines) is OLD, in poor health and crumbling.
  • Electric rates are increasing.

According to the North American Electric Reliability Corporation, (NERC) “Long-Term Reliability Assessment” of January 2026, this combination of events will result in a higher levels of blackouts, impacting tens of millions of users over the next five years.

The most vulnerable area is Texas. Apparently, Texas is like Hawaii, in that its grid is not largely connected with the greater national system. They are also seeing an increase of residents, industrial demand, data centers and bitcoin mining. Their grid isolation led to the 2021 power failure that resulted in over 200 deaths and makes them extremely vulnerable for future blackouts and losses. They are not alone, The Upper Mid-west, the Mid-Atlantic and the Pacific Northwest were also cited as vulnerable.

Add to this what we already know. (According to the Energy Information Agency [EIA] 2020 report and research done by the University of Minnesota on this topic.)

  • Americans experience an average of six hours of electrical disruption per year.
  • North Carolinians experience 30 hours of electrical disruption, five times the national average and twice as much as #2 Vermont.
  • The United States has more power failures than any other developed nation.
  • Americans experience more time without electricity than eight other industrialized countries.
  • Power failures in 2012 were ten times more common than in 1985.
  • Power failures doubled from 2003 to 2012.

What Do Lighting Folks Do?

It is time to take resilient lighting more serious. We can all buy some clunky battery backup light that looks like it was designed for a garage, but you wouldn’t want to put it anywhere else. If regular power outage is our new reality, we’ll need a recessed can (that looks like all the other cans in our ceiling) with backup power. We’ll need a decent looking flush mount and perhaps semi-flush luminaire that functions once the power disappears. There will need to be multiple styles, sizes and finishes. Building codes should be adjusted to require a handful of resilient luminaires in crucial spots across the home. To meet the needs of consumers, they should mimic their non-resilient sister. We should not suffer aesthetically because our power grid in not being protected by our elected officials. We need to do better.

I live in an older, inner-ring suburb of Cleveland that is supplied by underground electric from the 1925s to 1950s. We lose electric regularly; on an average of six times per year. As we rehabbed our mid-century ranch (also in the same neighborhood) we wanted to protect ourselves from this inevitability. We were okay with the occasional loss of electricity, (we’ve been here almost 25 years, it’s a reality of our life) except for the loss of heat. I wanted some sort of battery back-up for the thermostat and igniter/pilot. The furnace (and before it, the boiler) were gas powered. Once started, the natural gas would function fine. The only thing preventing a warm house was a small, low-voltage “spark” from the thermostat. Nothing was available. Everyone looked at me like I was asking for a gold-plated raccoon. Their only solution was a whole-home generator. That’s like using a gold plated .50-caliber rifle to kill the gold-plated raccoon. Perhaps the HVAC community won’t help, but lighting could be a better partner for homeowners.

The NERC report does provide some good news. California is no longer considered a vulnerable location for blackouts. After years of weakness, they now have a solar-powered grid of batteries ready to serve as backup, should the need arise. If only other states and the federal government would adopt this solution, we wouldn’t be in such a pickle. Until then, it’s up to lighting people to help America live with rolling blackouts by dedicating more resources to the creation of well thought-out, aesthetically pleasing, resilient lighting.

You know I love a big tranche of data! This report is chock full of good information. To read the entire report:

Categories
Technical Lighting Help

The Complex “Cost of Electricity” Data

Photo by Efe Burak Baydar on Pexels.com

Recently, my LinkedIn feed has been filled with conversations about the cost of electricity, likely due to the noticeable surge in price. Most include a graphic and many include dated or erroneous/suspicious information. I don’t think people are being malicious, this is a complex topic and the supportive data is equally fraught with confusion.

Energy vs. Electricity

When a point is being made about energy consumption that does not necessarily mean electricity. If you look at the US energy Information Administration (EIA,) energy is defined as electricity, natural gas and heating oil and propane. Some statistics even include the cost of gasoline and diesel fuel because it is energy we consume. Even more broadly, we could include the cost of coal, hydropower, solar, wind, geothermal, biomass, ethanol and uranium because they are used in the creation of electricity. None of these are wrong observations, but what information is right for a viable assessment of cost and cost savings?

As lighting people, we can’t really impact home heating and gasoline has little bearing on watts consumed to illuminate a space. The cost of coal, hydro or nuclear power are baked into our price per kilowatt-hour of electricity. That said, it might be easy for us to home in on the price of electricity, but that too, is complex.

The Different Prices for Electricity

Electric companies across the United States sell electricity at different rates to different entities. There are residential, commercial, transportation and manufacturing rates. There is also a combined average. If you are like me and have spent a career concentration on residential lighting, the residential price per kilowatt-hour is all that you need. Commercial lighting people will need the commercial and industrial (manufacturing) numbers to help aid in justifications.

States, Regions and National

Data is collected across states; states are accumulated into regions and a national average is finally calculated. All those numbers are made available and by themselves, are correct. So which do you use?

It is important to note that the price of electricity varies wildly across the nation. Hawaii is always the highest in the country, the Northeast corridor typically makes up the remainder of the “Top10” with Alaska and California also in that top ranking. The least expensive electricity seems to change each year from the bottom ten states. That means the national average should be considered just that, an average.

2024 Stats

(A note, about EIA stats. Yearly numbers take a few months to accumulate. The 2025 averages will likely be published sometime mid-year to the third quarter. For that reason, most people will be using the 2024 number for the next few months.)

The average price for electricity to the ultimate residential customer in 2024 was 16.48¢/kWh. For the commercial businesses, 12.75¢/kWh, Industry paid 8.13¢/kWh and the transportation sector price was also12.75¢/kWh. Across all four sectors, the average was 12.94¢/kWh.

https://www.eia.gov/electricity/annual/table.php?t=epa_02_04.html

To understand the wide variation of prices, the EIA breaks the data down. In 2024, Hawaii, of course had the most expensive residential electricity in the nation at 42.86¢/kWh and North Dakota enjoyed the least expensive electric cost of 11.51¢/kWh, almost four times less. The commercial, industrial and transportation sectors, by and large, fall into similar proportional rankings.

https://www.eia.gov/electricity/annual/table.php?t=epa_02_10.html

Hawaii is the most expensive because it is an island-state. It must generate all of its electricity on the islands. Buying or selling excess production is not possible, hence the high prices. Alaska also finds itself in the same position for the same reason. Within the contiguous United States, high prices are borne by densely populated areas and low prices are enjoyed in sparsely populated states. For that reason, California, New England states and New York comprise the list of the most expensive contiguous states.

The cheapest electric rates have a few anomalies. Washington is always on the list, because of the large amount of hydro generated power. Tennessee is also a constant primarily because of the TVA. The other states have smaller and more rural population, in general.

Twenty Years

I have been talking about electrical consumption for over twenty years. To help designers, lighting professionals and consumers understand the benefits of energy efficient lighting, first fluorescent, then LED, I talked about the long-term or lifecycle cost of lighting. To give people a better understanding of the financial reality, we looked at first cost PLUS the cost of electricity over the lifespan of the luminaire, knowing full well, electricity would increase.

When I first started delivering talks on lighting energy consumption, the 2004 national average cost of electricity was 8.95¢ per kWh. That means the average cost of residential electricity has increased 84.8% in twenty years! Has your salary increased 84% in that time? If not, more of your discretionary dollars are being used for non-discretionary needs.

As I began my research, I remember reading that electric cost had not really experiences huge jumps in the decades prior to 2004. Later, listening to a speech given by the CEO of ComEd, I learned that those rates were stable primarily because the market was continuing to grow. In the early 2000s, growth was difficult and even impossible. Fewer households were being formed, it was getting very difficult, almost impossible to build a new power plant and because of age, the power infrastructure was in dire need of replacement. She promised at the time, “Rates will/must go up.” Today, we are hearing that electric rates are rising primarily because of the massive draw required by data companies to facilitate Artificial Intelligence (AI.) To undertake this massive level of computer processing a lot of electricity is used. What’s more, it takes a lot of electricity in a country where almost no added electric creation is being built. No new output with substantial new demand and only limited ways to increase efficiency do not make for a good future. The short prognosis must be, rapidly increasing electric rates. Aren’t you glad the federal government cancelled all those wind and solar energy creation initiatives? (Sarcasm implied.)

But there is one more wrinkle, PUCs. Public Utility Commissions regulate the electric rates for regions and states. Because they are political organizations they may be resistance to increase rates commensurate with demand and reality. If that becomes the case, then expect electric reliability to fade. When the money is not available, maintenance is the first thing to suffer. Our 100 year old electrical infrastructure is in poor health. Things will break. Users have a horrible choice ahead of us, pay more for electricity or assume outages as a typical way of life. Sorry for the Sophie’s Choice, but this also explains the increased introduction of resilient lighting product.

I’m actually very pessimistic as we enter the second quarter of this century. America was finally looking at energy creation alternatives, but the Luddite community persevered. Even if we make substantial changes to our government makeup, progressive initiatives do not just restart in an instant. All this occurred while China continues to decommission coal power plants and increase non-fossil fuel alternatives. We could quickly enter a time with rapidly increased electric cost for a supply that is unreliable. I’m not sure I like that prognosis.

PS: To my Canadian friends and readers, SORRY, I have not done twenty years of research on Canadian rates, but I do know that Canadian utility companies have been far more proactive than US concerns. Hopefully you’re not in the same boat!

If you want the best information available on energy, check out the US federal government’s excellent resource, The Energy Information Administration:

https://www.eia.gov/

Categories
Technical Lighting Help

The Health Cost of Energy Efficiency

Since I have spent time trying to understand the health implications of light, I have read scores of scientific reports on the subject. The work of Dr. Mariana Figueiro is of course very central and most people in the lighting industry have had the privilege to read and listen to her talk about practical solutions for light and health. The name that comes up second is Dr. Martin Moore-Ede. He has probably been a louder voice with a perceived higher level of worry about the new LED and how they interact with human health.

His most recent realm of concern has been aimed at how LED manufacturers achieve more (and more) efficient LED light sources. He believes that the newer LED are eliminating output in specific color ranges to achieve the required efficacy. By so doing, the human body is not receiving enough light to satiate the demand of certain opsins in our body.

As you know, I’m not a doctor. Lord help us if indeed that were the case, so I’ll try to explain this as simply as I can, one lighting person to another. If you’re a doctor or a scientist, please stop here and read another blog post!

You, me and all other humans have a series of opsins in our body. These opsins are receptors in our eye’s photoreceptors that detect light in their various wavelengths and responds in some sort of predetermined physiological way. For example, Opsin #1 provides us with color vision and Opsin #2 allows us to see in minimal light and the dark. Most every LED works fine delivering light in this wavelength range.

Opsins #3, #4 and #5 are non-visual opsins. Receiving light in their required wavelength aid in human health. If an inadequate amount of light is delivered in these wavelengths, human health suffers. The correct amount of light at 480nm drives our circadian cycle, thanks to the work of Opsin #4. Opsin #3 requires light at 430nm and Opsin #5 requires a wavelength of 380nm. All three help regulate glucose levels, energy and retinal refraction. The increase in myopia (nearsightedness) is linked to reduced levels of the violet-rich (380nm) light needed by Opsin #5.

Light at the far-right end of the visible spectrum, moving into infrared light is likewise important for human health. This light, peaking at 825nm, is not detected by opsins because it has the ability to penetrate deeply into the skin. Proper amounts of light in this range have shown to improve blood flow, skin health and assorted healing properties.

Imagine you are a caveman or an early farmer, living off the land with no electric light. Much of your life is spent outside, planting, foraging, playing or cleaning. Daylight naturally delivers light in the full spectrum. The body receives an ample quantity in each wavelength, for each purpose. Skip ahead to today where children play inside and adults work in an indoor office or factory. To get the proper amount of light in the proper wavelength we must rely on artificial light.

Full spectrum LED lighting can provide light across all wavelengths, thereby delivering all the light needed for human health. As efficacy requirements are raised and consumers demanded less expensive options, manufactures have built LED that produces light across a narrower band of light. Most of the lumen measurement is concentrated in the green-yellow range (500nm-600nm.) While less expensive, they fail to provide the lower and higher wavelengths needed by these opsins and our skin.

Where Does That Leave Consumers?

The easiest answer is, “Spend more time outside!” Of course, that is somewhat impractical in today’s world. Your second option should then be natural light indoors. Place work desks near windows, prevent light inhibition, avoid using fenestration materials that filter out light wavelengths (if you have the option) and as a last resort, buy better lighting.

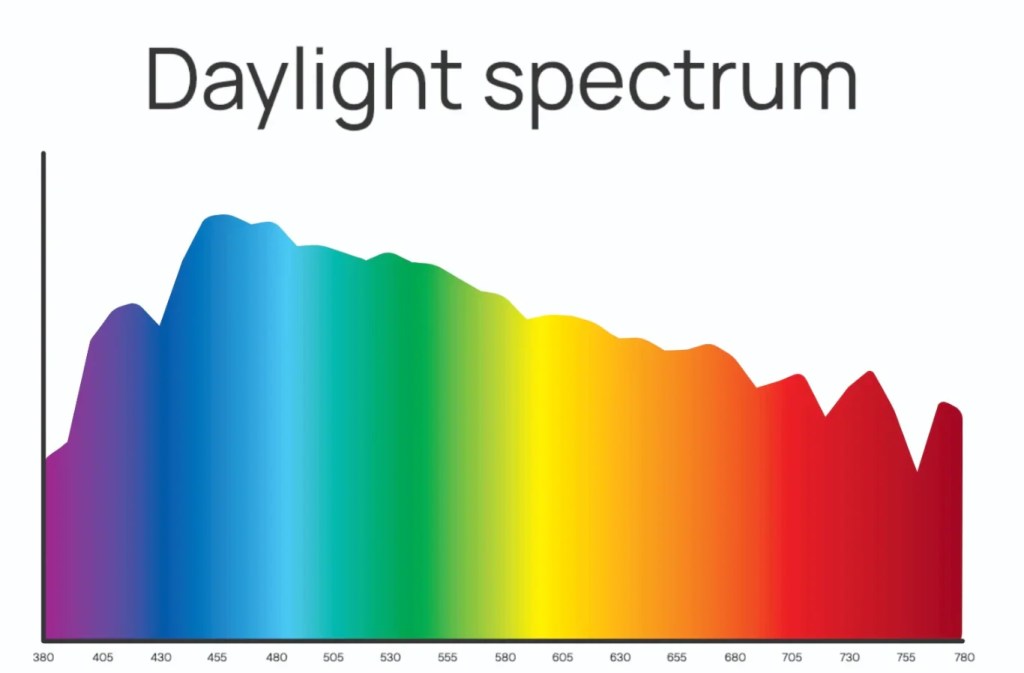
The color spectrum of natural light stretching across the area visible to humans

This is an image of the color spectrum of natural light across the area visible to humans. (380nm to 750nm) Ultraviolet light would be off the chart, on the left and infrared light is situated off the chart, on the right. While there are some peaks in the blue area, most of the colors are equally and evenly delivered.

If selecting artificial daytime light, you want to look at a spectrum diagram of the light and select one that is as close to this as possible. It is important to know that artificial daytime light should ONLY be used during the day. We need great light during the day and minimal levels of warm/red light at night. Using full spectrum light at night might have an adverse impact on our circadian system. Again, go back to our analogy of a pre-electricity farmer. Even on a great day, the sun did not shine for 24 hours. Think of a full spectrum light as a replacement for sun, not a light bulb. (Some full spectrum LED is available with a nighttime mode that removes the blue, thus creating a warmer evening illumination.)

Remember too, Full Spectrum lighting is NOT the same as Daylighting. Most daylight LED is simply 5000K to 6500K and not likely to be spread across the full spectrum. Full spectrum lights do not have to be 5000K or 6500K, but might.

One more thing. The sun is very bright. Light bulbs are not the same as the sun. You can get the right color of light from a lamp, but not the same amount. Think of full spectrum artificial light as a supplement to the sun, not a replacement.

I hope this has helped a bit. This remains a complicated issue. We are hoping artificial light can alter lifestyle changes. Perhaps it can help, but it is unlikely to replace the body’s need for sunlight. When possible, get outdoors, plant some flowers, drag the laptop onto the patio when you’re working and do your homework on a lawn chair. Your body will thank you…and you’ll sleep better, too.

Categories
Technical Lighting Help

Is Home Automation a “Time-Saver?”

Photo by picjumbo.com on Pexels.com

My wife and I have just moved into our new-old home. We have spent almost a year restoring and reinvigorating a mid-century ranch that will deliver a more carefree (and step-free) life for us as we age. Because of the rough state of the home when we purchased it, a rewire was required. Many walls were removed (black mold) the ceilings were taken out (water ingression from a leaky roof) and fuse boxes removed (Federal Pacific Electric Panel.) The lack of physical encumbrances made the lighting choices easier. I could spec almost everything I wanted and the wiring part would be easy. (Well, easier. Doing so within the confines of maintaining the mid-century characteristic of the home soon became the hindrance.)

I decided to install a Control 4 Home Automation system to “run” the house. Security, lighting, garage door, shading controls, temperature control and intercom could fall under one umbrella. The Bosch appliances, themselves supported by a proprietary app could be brought into the group. There are other functions that could be integrated as well. Luckily, I have been using a local tech-guru that helped me through this process. More often than not, when I asked if something could be done, his answer was, “Yes!” I cannot amply stress the importance of having a tech-champion on your team. This person is as important as a plumber or an electrician. (Please note, a tech person COULD be an electrician, but an electrician is not necessarily a technology expert! Get the right person for the needed job.)

I wanted the system because of my belief that, despite the conflicting realities, automation is probably more beneficial to seniors than the tech-savvy Millennials. My wife selected faucet handles that will work better for arthritic hands, the AIP contractor suggested a drawer microwave because it is more conducive to someone who might be wheelchair bound. Wet baths were included to eliminate the possibly hazardous step and aesthetically sensitive grab bars were included, just in case. Automation systems can be equally helpful for many of the other things that become a struggle as we age.

The back of the house features sixteen large windows that look out on a wooded area (in the middle of an inner-ring urban/suburban neighborhood.) Without automation, opening and closing them daily could be an onerous task. Insuring nightlights are turned on at night has shown to reduce falls in seniors. That is an easy thing for home automation systems. Nighttime security checks can quickly be achieved by a control system. All of these things should make life for us better as we age. All of these things should not be a burden.

I was reminded of the burden of automation after reading a New York Times opinion feature that shared the fact that automation is NOT saving us any time. Workers using AI to “help” are not saving time. Technology-enhanced homes are not allowing active young homeowners added time to lollygag and “chill.” Statistics state they spend roughly the same amount of time doing (loosely defined) housework as their parents. But why? The creators of these products promised me peeled grapes and a pink pony!

Each time my wife attempts to book a doctor’s appointment online, I am reminded why technology does not always save time. The two-step authentication becoming more and more ubiquitous was probably invented by lawyers in an effort to protect their litigious-prone industry. How many times has a slow server, or a weak Wi-Fi connection caused you to “time-out” of your ability to enter the six-digit code? My moderate dyslexia invariably forces me to reenter the number more than once. Does the cybercrime version of Boris & Natasha really care my annual physical is scheduled for next Thursday?

I’ve never figured automation to save me time. In pre-computer days, when I managed an Engineering Department, I had an assistant. If I needed communication to be sent to people in the company, outside the company, whomever, I asked her to write a note to them about whatever topic was required. Later that day, she had typed a letter covering the required topic. As fax machines came online, I was required to write letters with sketches and details she could not complete. When each of us was given a computer and an email address, all of the correspondence was now my responsibility. My assistant could no longer handle that portion of my workload. I was now the typist. Luckily for her, she was an immensely talented person and went on to manage her own collection of people in a different area of the company. Automation simply meant I now had more work. Different work, but more than I had prior.

I did not buy and have installed a Control 4 home automation system to save time and money. I did not expect to save energy. I did hope a home support network would allow my wife and me to live in our last home longer by eliminating some of the more cumbersome tasks from our daily routine. I still believe this to be true. I am also realistic (and old) enough to know that sometimes you get wasabi and sometimes you get horseradish with food coloring and cornstarch, more often, the latter.

Categories
Technical Lighting Help

Why is Color Fidelity Better Than Color Rendering?

Photo by Magda Ehlers on Pexels.com

In my last blog post, I explained the recent recommendation by the CIE (International Commission on Illumination) to move away from CRI and replace it with Rf, CIE General Color Fidelity Index. Almost immediately, I was asked why. It’s a good question. On the surface, they appear to be very similar.

  • Both use a zero to 100 ranking system
  • Both use the same Spectral Power Distribution (SPD)
  • Both compare a source against reference colors

This last point is what makes the biggest difference.

Color Rendering Index (CRI) uses only eight reference colors. All eight are pastels with similar levels of saturation. For years, known flaws included the lack of red, bold colors and flesh tones, but because incandescent light does a good job rendering pastels, it never raised much concern. The rise of LED laid bare the failures.

To solve this key flaw, Rf uses 99 reference colors, evenly spread across the color spectrum. These are also colors drawn from real-world objects and dyes. A wider sampling will deliver a more realistic metric.

One additional pushback I have heard concerns the similar results garnered by each test method. Perhaps the CRI is 90 and Rf is 92. Of course, that is possible. MicroSoft Windows 1.0 could allow us to write a letter and the same can be said about today’s most current operating system. The difference is in all of the other features. As we begin to use and understand Rf, the added features will grow in value. With the added data provided by Rf, one might find one light source does a great job rendering wood tones and another a better with bold blue colors. As lighting professionals, we can select the light that best suits the application. As the CIE address the other know flaws, new measurements will build on this foundation to be more robust method of color measurement.

I can’t stress this more. Find a way to introduce yourself to this new metric. Like commercial lighting professionals have realized before us, the advantages will far outweigh the learning curve.

Categories
Technical Lighting Help

Goodbye CRI, Hello?

Photo by Alexander Grey on Pexels.com

You may have heard that the CIE (International Commission on Illumination) has finally agreed with numerous illumination and color of light experts to abandon the Color Rendering Index (CRI) method of measuring the quality of white light. That was the easy part (not really, it took a long time, but stick with me.)

While those of us who simply want to specify and use good light have referred to this characterization as CRI, the CIE calls it Ra, CIE General Color Rendering Index. They are recommending a replacement with Rf, CIE General Color Fidelity Index.

When we lived in an incandescent and fluorescent world, CRI worked fine. As we started to employ more fluorescent and then a total LED replacement, the known flaws in the CRI system became more and more apparent. Something different was needed. Early on, the CIE admitted that CRI was not acceptable, but was noncommittal on a replacement. This world organization is known for its detailed deliberation. When it makes a decision, it comes with a lot of weight.

Over the years, a number of replacement concepts were proposed and rejected until the lighting community was presented with TM-30. While there were a few objections, most everyone agreed this was a superior metric. Much of the commercial lighting industry has already begun using TM-30. We decorative lighting folks have maintained an allegiance to CRI for very clear reasons. It was easy. 100 = good; zero = bad. If we’re close to 100, we should be satisfied. Besides, we have just begun to take light quality seriously, some slack was needed to be given to those of use less technically inclined.

One reason TM-30 is so fully supported is because it is actually two different measurements packed into one metric. There is a one-for-one replacement for CRI or Ra. That is Rf (fidelity.) It also measures color saturation and that portion is call Rg (gamut.) The CIE also recognizes that a single fidelity measurement does not tell the whole story. They are setting a foundation for a more comprehensive metric that could be TM-30, or could be something else.

What Can Decorative Lighting Expect?

I understand change is hard. I was around when decorative manufacturers, retailers and the design community needed to digest a new set of data points. Color Temperature and CRI were rarely discussed and poorly understood prior. Nonetheless, we all rose to the occasion. Here’s what we should expect to see in the coming months and years.

TimingMetric 
The past and currentlyCRIWe may see many decorative manufacturers cling to the old measurement
Coming SoonCRI + RfTo help in the transition, showing both numbers will help users understand the number and the benefits of change
FutureRfWith the term an integral part of the dialog, CRI can then be eliminated
The Desired FutureRf + Rg (?) / TM-30 / ?Everyone understands we need a more comprehensive metric. Will TM-30 be the answer, or a stepping stone to something else?

I don’t know how long it will take for the decorative lighting world to see this change, but I do know, TM-30 was adopted a lot faster than I had expected in the commercial space. For that reason, I urge you to take a minute or two and understand what could be coming your way. Remember when you were the only one who understood CRI? That time is coming again.