A few months ago I posted some statistics about the lighting in the house my wife and I just rehabbed as our “age-in-place” final home. An architect friend I have known for many years reached out, suggesting I post more about the specific “before and after” aspects of the new property. I told him, in a way, I have done that with a CEU session detailing the whole process, from a lighting standpoint. So why not break it down, room by room, in a written format? This is the first post responding to his good idea.
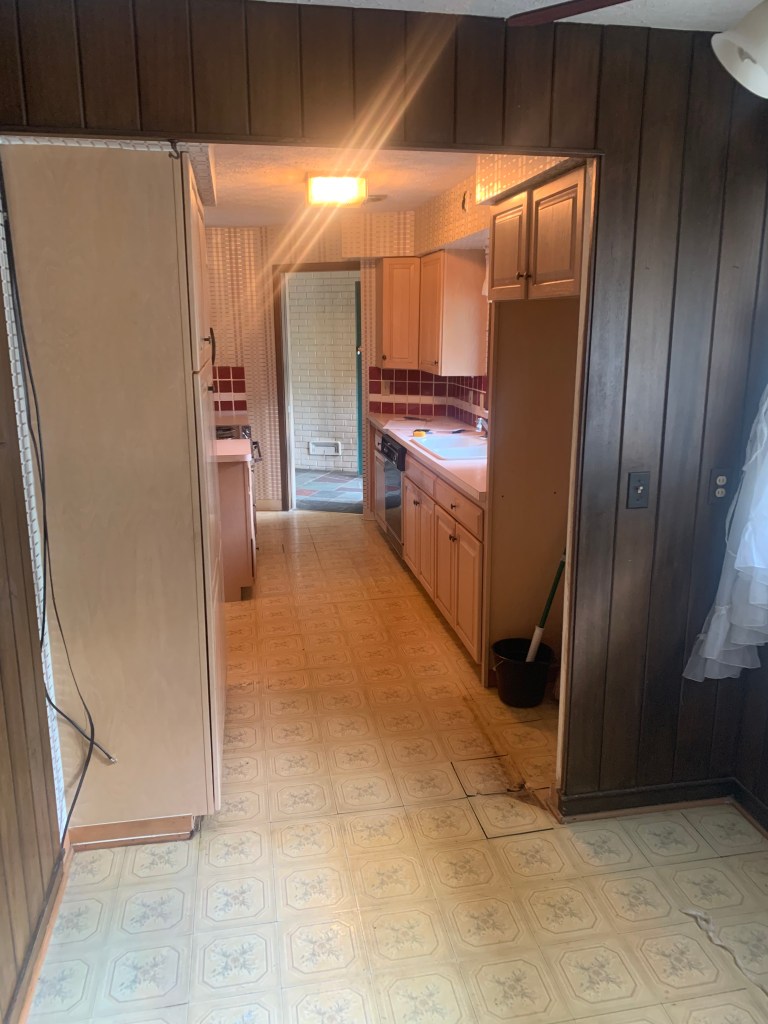
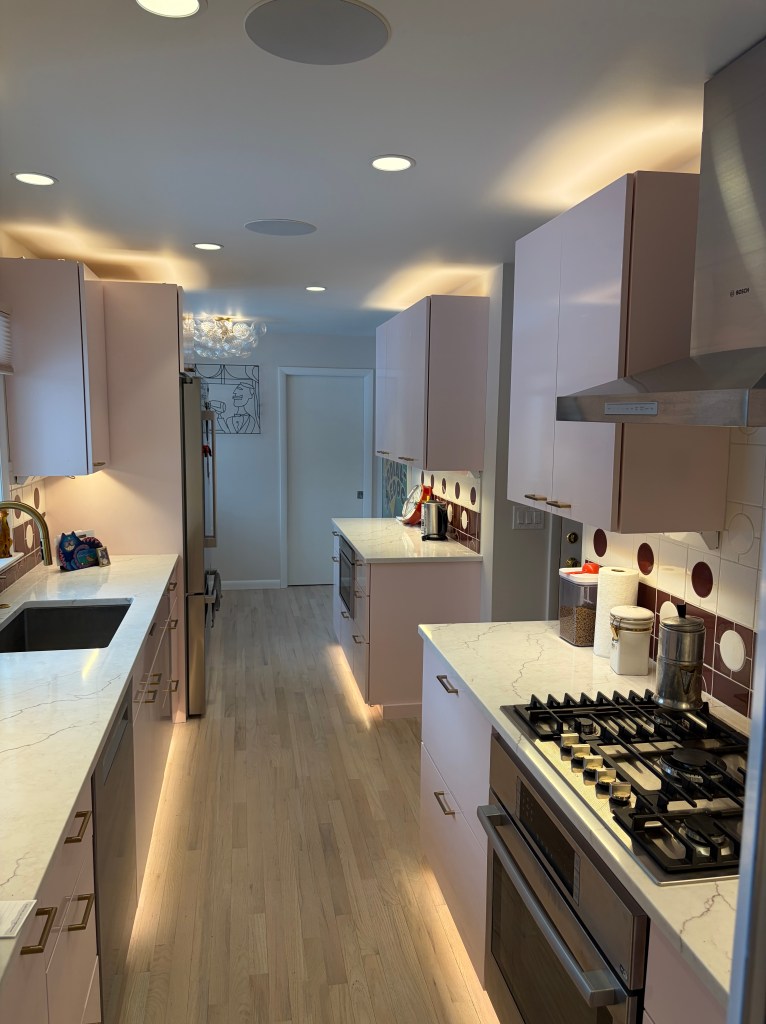
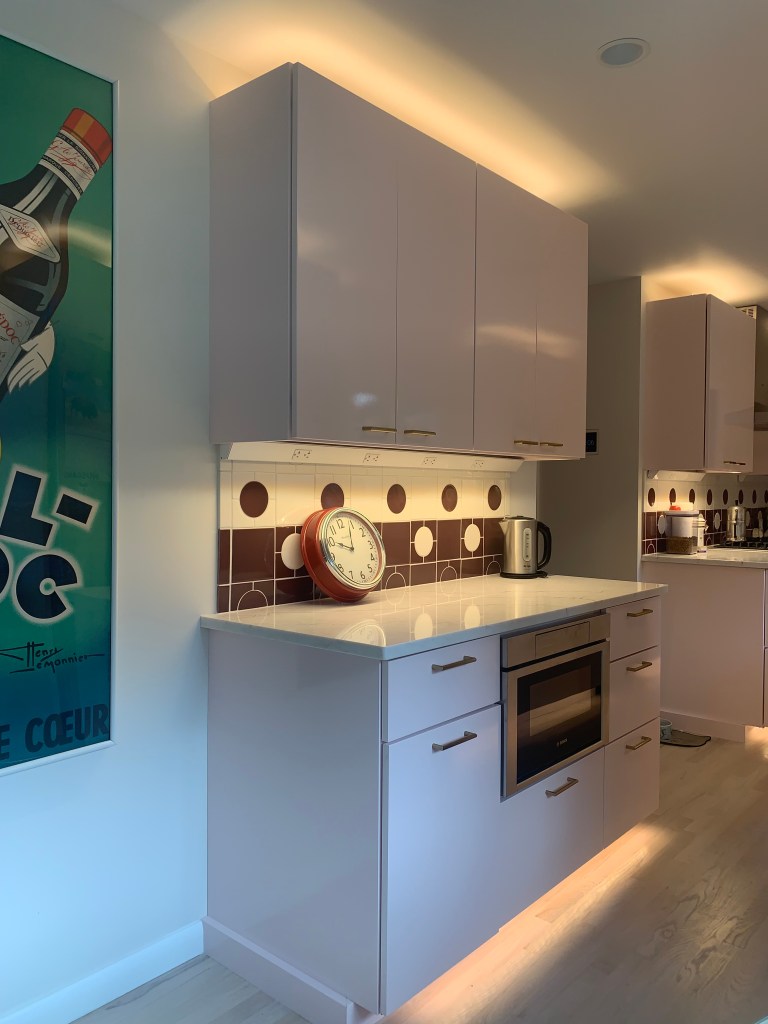
Based on the design, my wife and I believe the kitchen in our new mid-century home was rehabbed at some point in the 1980s. The cabinets were of decent quality, but the overall look was dated and “old” feeling. In the dinette area, the original 1957 solid wood paneling was still in place, but unlike the rest of the house, this wood was stained a VERY dark, blackish-brown. An original sliding glass display case was embed in one wall. We thought about keeping both, but could not rectify their existence with the vision we had for the whole room. The paneling and display case were the only original elements we intentionally removed from the house.
“I want a pink kitchen!”
Many homes in our neighborhood are being flipped. We toured scores of them and they had one thing in common, grey kitchens. I was nonplus, but my wife hated them. Now that she had a clean slate, the sky was the limit.
While working with the cabinet designer, we were shown a sea of wood cabinets options, none of which either of us wanted or liked. We initially figured we’d end up with white, then she told the designer of her heart’s desire. He was startled. Pink cabinets were a new one for him and he was taken aback. The GC jumped in, suggesting painted cabinets as a solution.
“What color, pink?”
“Pink.”
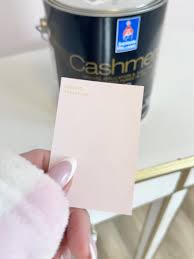
The GC and I quickly went next door to the Sherwin-Williams store and we simultaneously reached for a subtle tone of pink, Cotton Candy. We ran back to the cabinet store and showed it to my wife. “Yes! Pink.”
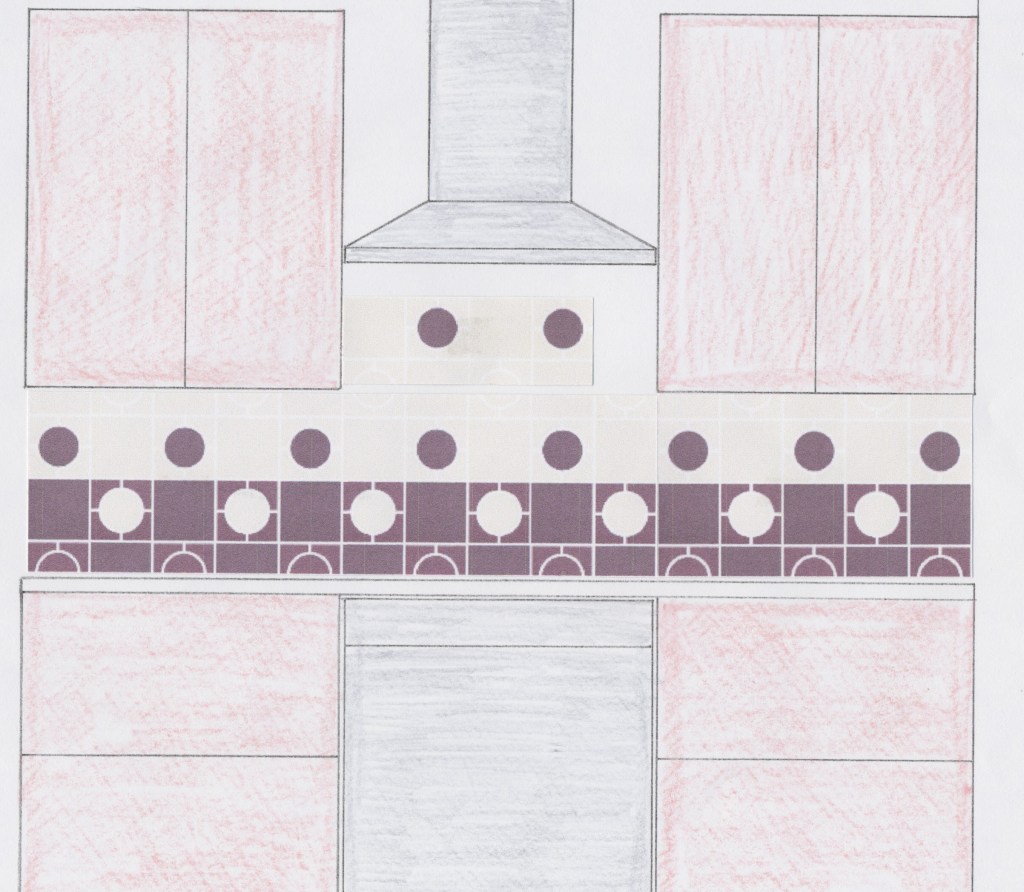
After vising eight granite/stone/quartz showrooms, we finally found a countertop that would match the pink. The backsplash selection was a similar challenge. After we found the color, I designed a dozen pattern configurations and she picked her favorite. Initially, she wanted more pink on the painted walls, but I was able to talk her off that particular ledge. After deciding on blush pleated shades and a bleached white wood floor, I could then concentrate on the important part, the lighting!

Good Lighting
One added trend in all the “flipped” houses we toured was the horrible flat, quasi-recessed lighting used. Almost nothing in new or rehabbed homes is as egregious as the wafer light infestation. Miserable light, that adds glare and doesn’t drop light onto the work surfaces, is not a solution I wanted. I sought out a deep recessed option and found two possibilities, Nora Sapphire III and WAC FQ. Both offered multiple beam angles, lumen output options and assorted color temperatures. I decided to use the Nora brand because they affirmed a 2 ¾” depth and WAC customer service said theirs was, “about 2 ½”.” “About” made me uneasy.
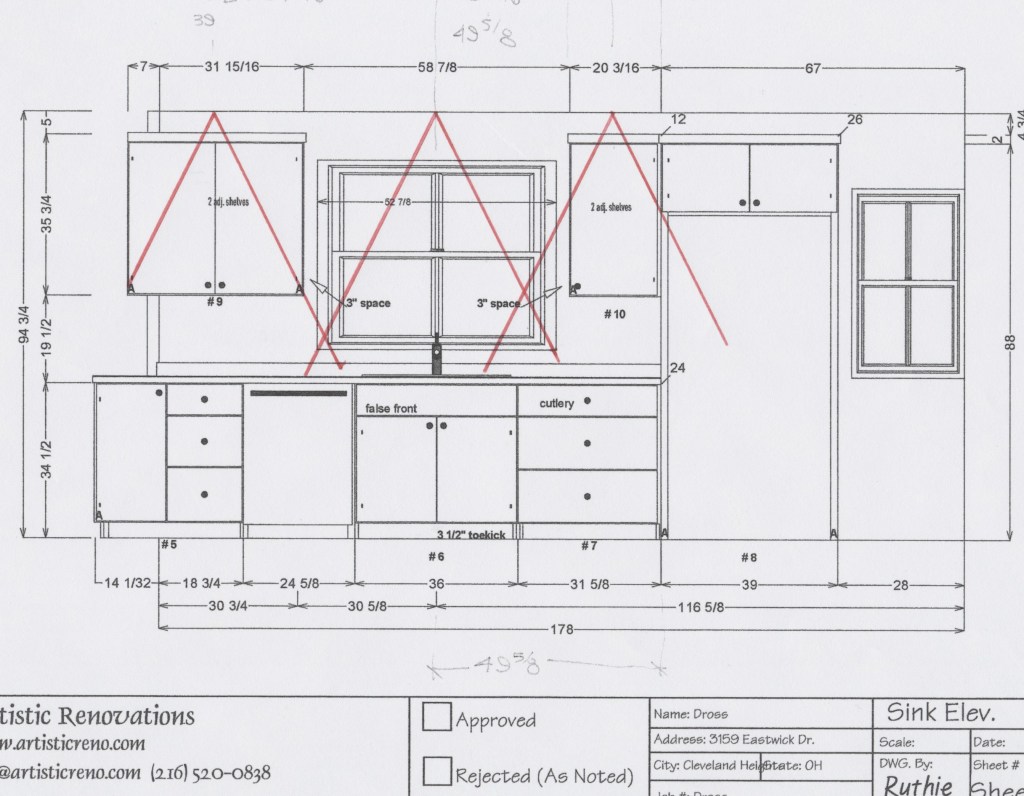
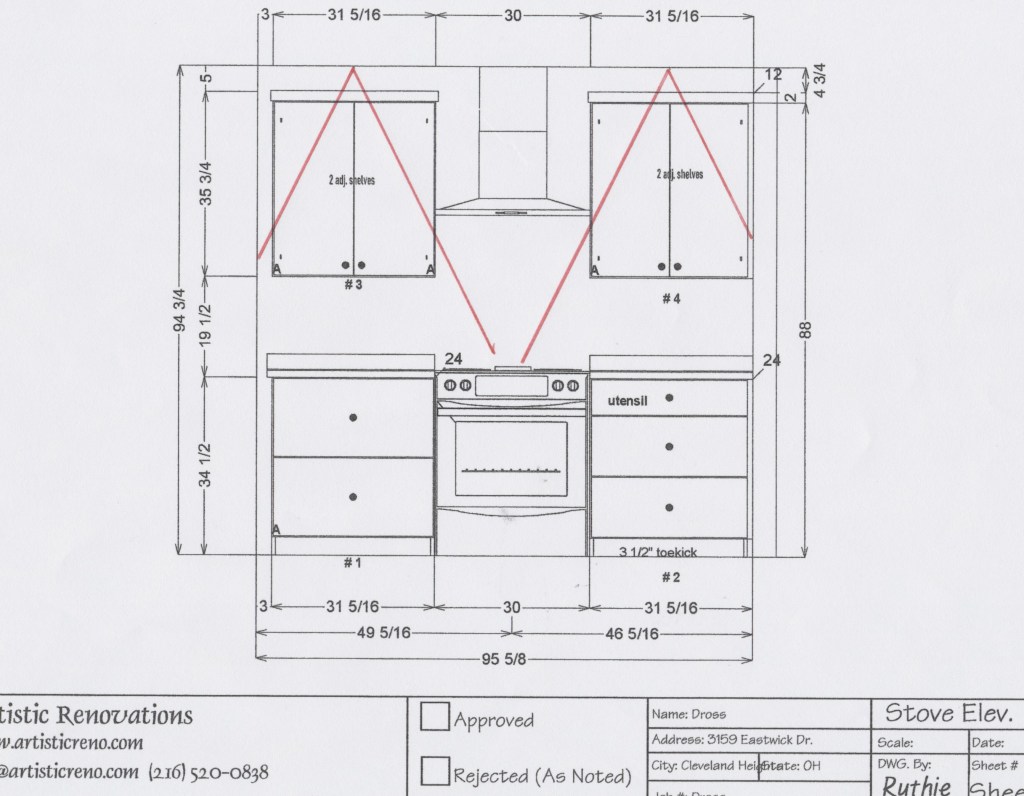
I laid out the recessed placement using both the 38° spot and the 53° narrow flood. Intuitively, I knew the 64° flood wouldn’t give me the illuminance I wanted at the work surfaces. I settled on the 53° option. I also decided on 3000K to insure a great color for foodstuffs and the room finishes. I then provided the electrician with detailed placement measurements for the housings.

LED Tape
I knew I needed an LED Tape manufacturer with a lot of options. I reached out to a number of Lighting Reps I know. Almost all of them told me to check out American Lighting. They were right; they offer multiple output variations, plenty of color choices and even though I wasn’t interested, they manufacture sheets, wet outdoor, COB, dim-to-warm and color-changing product as well. There are different run-length choices and even a 120V alternative.
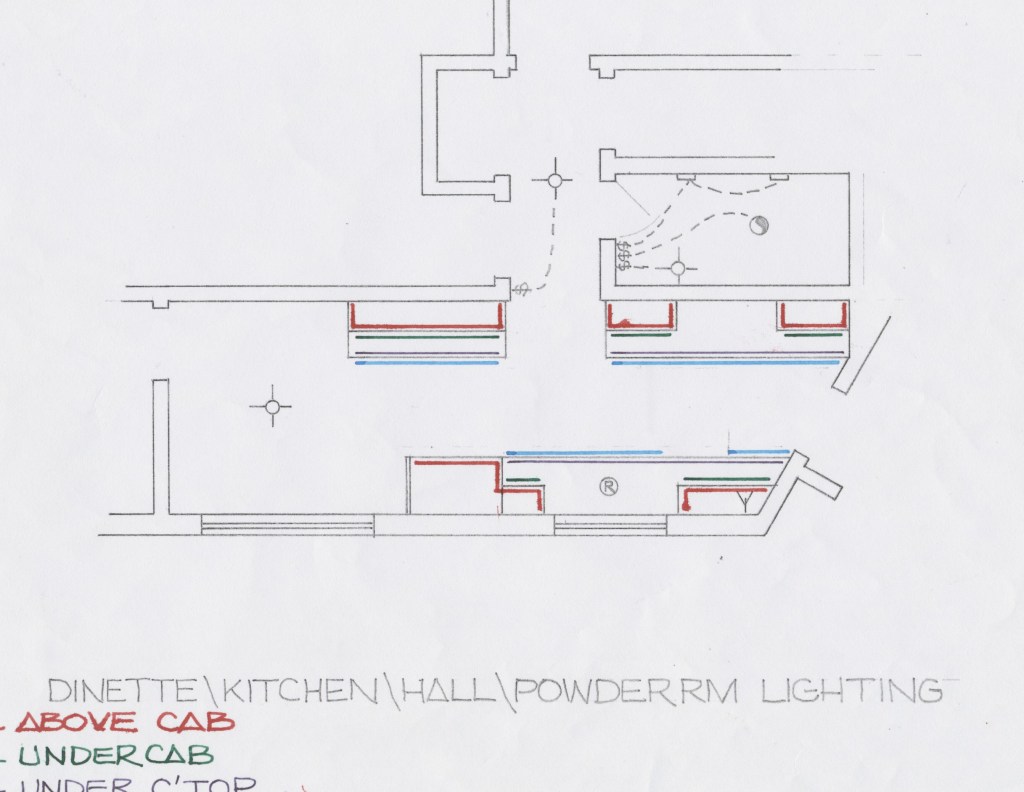
Under cabinet lighting is crucial to good kitchen lighting. I used an LED Tape that pushed out over 1000 lumens per foot for that application. I like to use above cabinet lighting in the morning, so I selected the LED Tape that delivers 310 lumens per foot. This presents a beautiful indirect glow, at the start of each day. Our toekick lighting is on for most of the evening. Not much is needed, so the basic product distributing about 140 lumens per foot was adequate for that job. One vendor, three products and a solid lighting solution.
I personally installed all of the LED Tape. (The power supplies were hardwired by the electrician.) The only problem that occurred was with the connectors. While it does not say so anywhere (that I could find) the connectors are unsuitable for solid-core wire. Unfortunately, the electrician used solid core, Class 2 suitable wire to travel from the remote power supplies to the application position. I was forced to “hide” wire connectors at almost every junction point. This was frustrating and not what I expected. Installation time was tripled. Imagine if I were earning journeyman electrician wages! I hope at some point in the future, they develop a solid core wire connector. American Lighting customer service was of no help either, so that was disappointing.
Decorative
Only one decorative piece was planned for the kitchen. Because the ceilings are at 8’-0” and my wife specifically did not want a hanging pendant that could interfere with normal room navigation, we decided on a semi-flush and we wanted it to be a decent diameter. To maintain the theme of circles started by the backsplash, we sought out a unit with spherical diffusers. After considering a few others, we decided on the Visual Comfort Talia. I installed 2700K lamps to create a warmer glow from the layers of clear glass and gold frame.
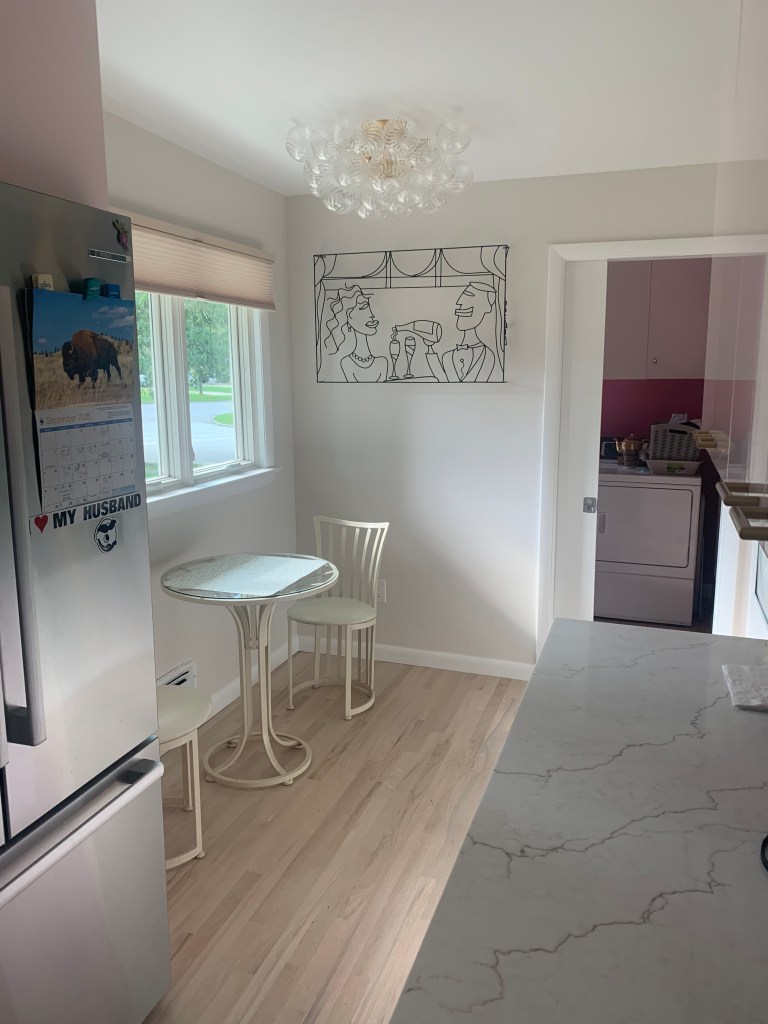
Because I installed all of the lighting, I did appreciate the comprehensive instruction sheets and the “spare” glass baubles. While we are currently using a small café set we bought for our first remodeling project of a 9’-0” x 10’-0” kitchen, three houses ago, we think it will allow us to grow into more meaningful space in the future.
Controls
Our house is controlled with a Control 4 home automation system. We’ve tied the toekick and above cabinet lighting into the system. The toekick lighting functions as a nightlight from dusk to 11:00PM. We have not yet imagined a scenario for the above cabinet lights. Should the desire arise, we can upgrade to controllable switches for the recessed, under cabinet and dinette area lighting, but we do not yet see the need.

If you read my blogs, you likely know I don’t use many dimmers, especially in the kitchen. With four switches in the room, I can establish 24 combinations. Do I need more? It is unlikely. By selecting one of the 24, I have exactly the right amount of light.
Illuminance Measurements
How much light is enough light? In the last house, we existed for about six years before we rehabbed the kitchen. That meant BAD lighting for a long time. We also understand that old age means more light will be needed. Once you have good kitchen lighting, you cannot go back.
I took these measurements at dusk. The sky was clear, the sun had just set, but it wasn’t yet dark, so there is a bit of light coming from outside. (See first line of data.) I averaged measurements from five locations on the 17’-0” liner feet of countertop and backsplash to arrive at the number stated in the chart.
| Type of Light | At Sink (located in front of window) | At Front of Countertop | Countertop at Backsplash |
| Dusk via Windows | 17.0 fc | 1.86 fc | 1.02 fc |
| Recessed Only | 109.0 fc | 81.66 fc | 19.0 fc |
| Under Cab Only | 38 fc | 247.6 fc | 318.4 fc |
| Above Cab Only | 29 fc | 21.06 fc | 7.96 fc |
| Recessed & Under Cab * | 136 fc | 334.0 fc | 323.2 fc |
| All Lighting On ** | 150 fc | 338.2 fc | 333.4 fc |
* Most popular option for cooking
** Rarely used
As you can see from these measurements, the layered approach to light really makes a difference. Consider the following:
- While the recessed lighting delivers an adequate level of light at the front of the countertops, darkness looms at the work surface near the backsplash
- With only the recessed light, shadows are a concern on the countertop. Hence the need for other lighting emanating from a different direction.
- Conversely, if the under cabinet lighting is used alone, the countertops are well lit, but the remainder of the room, not near an upper cabinet (see sink) is left in the dark.
- Toekick lighting which delivers about 150fc on the floor, under the toekick and 17fc on the floor, 2” from the toekick edge, do not add an appreciable level of light to the work surfaces.
- The over cabinet lights, likewise add only negligible levels of light to the countertops (compare last two lines of stats, the difference being the addition of upper and toekick lighting)
- This means the toekick lighting and the above cabinet lighting perform very specific tasks. Crucial nighttime navigation and supplemental lighting as the morning light breaks. In addition, they carry a much heavier aesthetic load, especially when used together during times of entertainment.
In these numbers, it is easy to quantify a statement everyone in the lighting industry says repeatedly. For proper illumination, multiple layers are needed.
Final Thoughts
I had intended to include under-counter lighting to wash the front of the lower cabinets and illuminate open drawers. I included them in the previous house and found them helpful, but the design of the cabinets and placement of the countertop would have rendered them somewhat ineffective. I abandoned the idea after a few conversations with the fabricators. I also elected to use ceiling mounted audio speakers after realizing the minimal exposed space above the cabinets. Our previous house had 8’-5” ceiling heights. (Yes, I know. Odd.) With so little space, I decided to place the bookshelf speaker in another room. That meant two more holes in the ceiling. Statistically, we have the right light. We also feel we have good lighting that meets our daily needs.
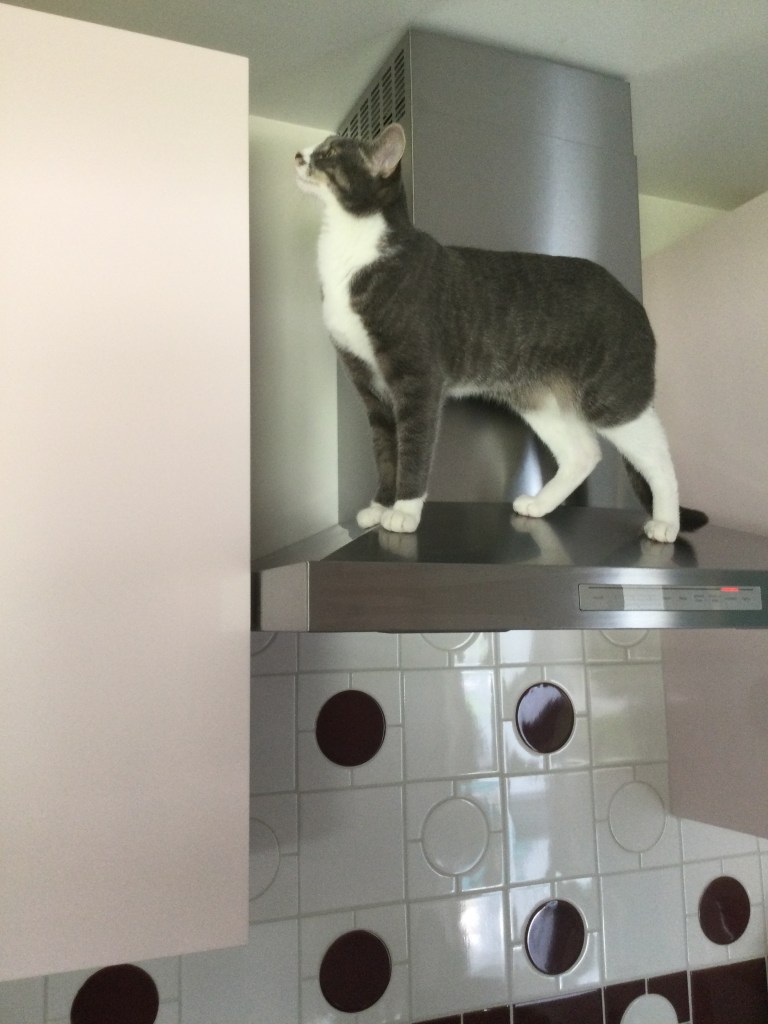
Upon closer inspection, even our cat, Kit agrees!
If YOU have any thoughts, I’d love to hear them! Look for additional posts covering other room throughout 2026.

5 replies on “A Lighting Guy Rehabs a House – The Kitchen”
Fantastic ! Thanks for sharing
from, Ginny Jacober, Blue Bear Design
Anchorage, Alaska
LikeLike
Excellent case study Jeffrey!!! And astounding footcandles out of your undercabinet lighting: what is it specifically (I know it’s american lighting). The most I see out of most undercabinets is 110 fc.
Wonderful layering
LikeLike
Hi Doug!
Thanks for the suggestion on digging deeper.
I used LED Tape for the under-cabinet applications. American Lighting Trulux Vega
https://americanlighting.com/vtl
There really is no point in using undercabinet luminaires any longer. They remain big and clunky. I installed an aluminum channel 3 1/2″ from the front of the upper cabs (3/4″ undercut) The biggest issue is the connection to Class 2 low-voltage wire. Make sure they use stranded wire. My electrician used solid core wire and the Am. Ltg. connectors are not engineered for that type wire.
Feel free to reach out any time: bowtie.jeffrey@gmail.com / 216-276-3787
LikeLike
Jeff,The kitchen looks beautiful. I had visions of a pink nightmare, but you actually made it work. The ti
LikeLike
Thanks Frank!
I’m pretty happy with the outcome. Michele is happy too, so it is a win-win!
LikeLike