Since the introduction of fluorescent and LED retrofit lamping designed to take the place of incandescent light bulbs, fit has occasionally been a problem for consumers. Sockets are designed for the shape and contour of incandescent glass envelopes. Because of ignorance or lack of detail, poorly realized retrofits lamps on occasion, do not “fit” or function.
Why?
Fit has especially been a concern with “globe” or sphere shaped lamps (“G” type, as ascribed by the industry.) To understand the problem, let’s first look at an incandescent G-16 ½ candelabra based lamp. Many people call these golf ball lamps because of their similar size. Similar issues may occur with larger, medium-based “G” lamps, as well.
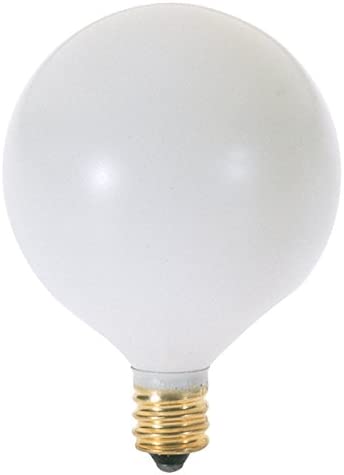
With a full glass envelope on the incandescent product, you can see how the blown glass envelope gently tappers into the screwshell (the threaded portion at the base of a lamp.) The screwshell makes contact with the electricity delivered inside the socket.
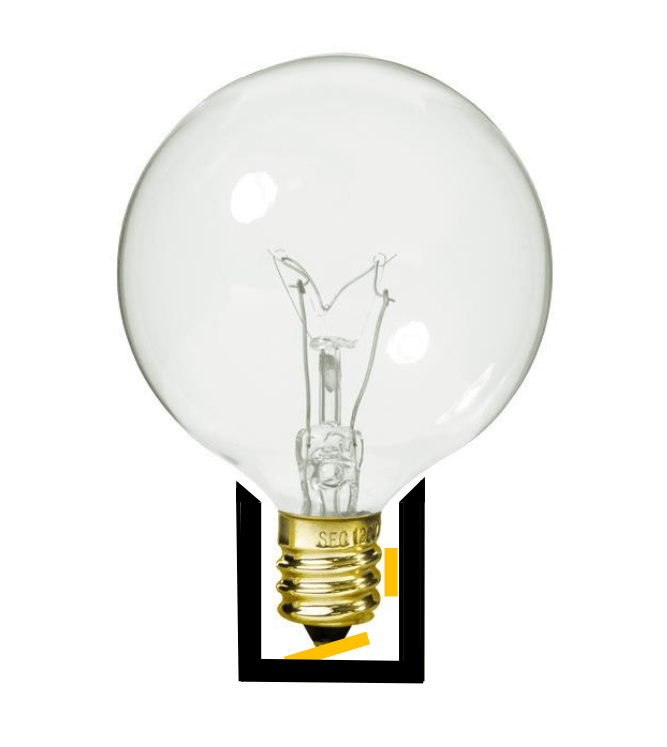
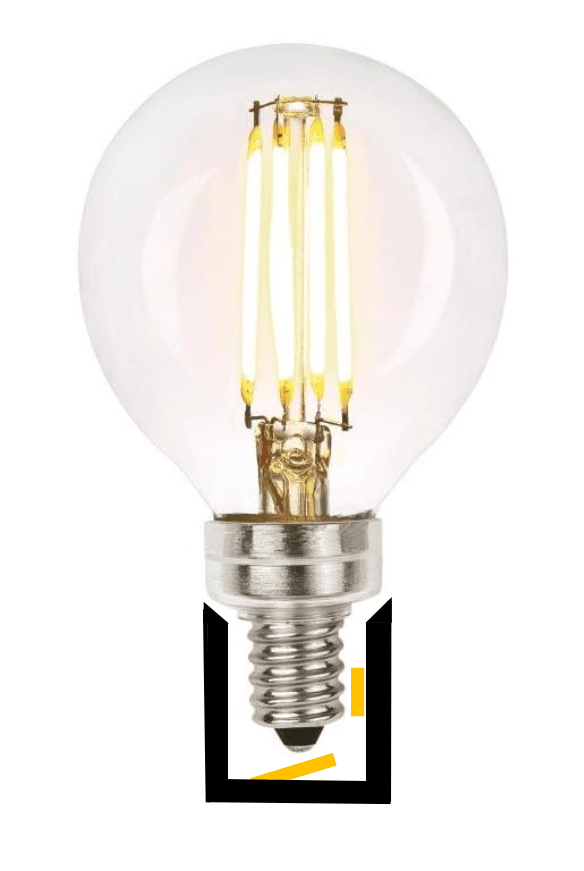
When inserted into a socket, the “hot” side of the electric current touches the bottom of the light bulb via a small copper tab at the inside bottom of the socket. The negative, or neutral half of the electric supply is provided to the screwshell on the inside edge of the socket. The positive and negative contacts are represented in the image as gold rectangles.
Also, note how the rolled edge of the glass curves into the screwshell and curves around the tapered inside edge of the socket. This insures the bottom of the light bulb easily touches the contact at the bottom of the socket.
LED retrofit lamps create light with the use of a collection of electronics. Those electronics are located in the area between the glass envelop and the screwshell. In the photo below, the chrome sleeve under the glass houses the electronics.

When we insert the LED retrofit lamp, the chrome sleeve prevents the screwshell from fully turning into the socket. When that occurs, the bottom of the light bulb cannot touch the copper tab and the light bulb will not function.
Many people, when experiencing this failure believe it to be a LED lamp malfunction, but it is really a design failure. In instances where the socket is slightly wider, the copper tab is sitting higher or the edge of the socket is shorter, the lamp will work without an issue.
What to Do?
If this is an experience you have, the best thing to do is buy a different brand lamp, one with a better contour between envelope and screwshell. Some screwshells have also been elongated. If an alternative is not possible, there is one other thing you could do, but it must be done with care. Usually, the contact between copper and light bulb is millimeters away from making contact. A gentle lift of the copper tab could be all that is needed. It could also be unusually flattened over years of use. The reason for caution is electricity. We tell children not to shove things into electric outlets for a reason. An electric shock, a short, or worse can happen.
If you’d like to try a solution, shut off the switch on the wall and trip the circuit in the electric panel or unscrew the fuse in the fuse box. BOTH are a MUST!! Do not go any further without completing these steps!! (Seriously, unless you like the feeling of 120 volts of electric power coursing through your body, do not move forward without shutting off the power at the circuit!)
With a long, strong, wood or plastic stick (chopstick, knitting needle or crochets hook,) gently pry the copper tab up EVER SO SLIGHTLY!! As said, the gap is a fraction of an inch. There is no need to exert Hulk-like power! Reenergize the circuit and turn on the switch. If it does not work, it is time to try another brand of replacement lamp.
Expect Things to Get Better
Retrofit lamps are getting better. The electronics are getting smaller and even the least sophisticated manufacturers now understand what could be inhibiting a full electric connection.
I live in a historic home build with a two-car garage in the basement. This was quite an unusual feature for homes in the late 1920s. At the time, cars were substantially narrower and much longer than the average car of today. Consequently, I have no storage at the sides of my garage, but the front is packed solid with all the things we house in our garages. Moving the car in and out of the garage requires skill, with about 2” of room separating the rearview mirrors and the door frame, on each side.
Like newer cars and my garage’s elongated shape, the new light bulbs can and will work on sockets designed for a different era of technology. Just a little skill and patience is required.

4 replies on “Hey! My Light Bulb Doesn’t Fit!”
Hey – I just experienced that problem last week – the new LED
replacement didn’t light/fit so I put in a regular bulb. I had
wondered about lifting the copper tab. Glad I didn’t now,
because I would have forgotten to cut the power. Thanks for
your awesome tips.
Ginny in Anchorage
P.S. have you noticed that the ceiling medallions for light
fixtures are so drab ? All the design going into the gorgeous
chandeliers, pendants, etc. and then ending at the ceiling with a boring hardware blob !
LikeLike
Great observation! I know some manufacturers spend more though on the canopy, but as you suggest, not enough!
LikeLike
You always have such great topics about lighting. I’m an interior designer and I did think about the base/screw area, but forgot about any possible collar. Thank you!
LikeLike
Thanks Jill! Glad it is helpful!
LikeLike